
Installation instructions for the bicycle trailer coupling
The VEOLO Cargo Trailer can be attached to the rear wheel of almost all bicycles.
We explain in five steps how to correctly mount the bicycle trailer coupling and which accessories you need depending on the axle type.
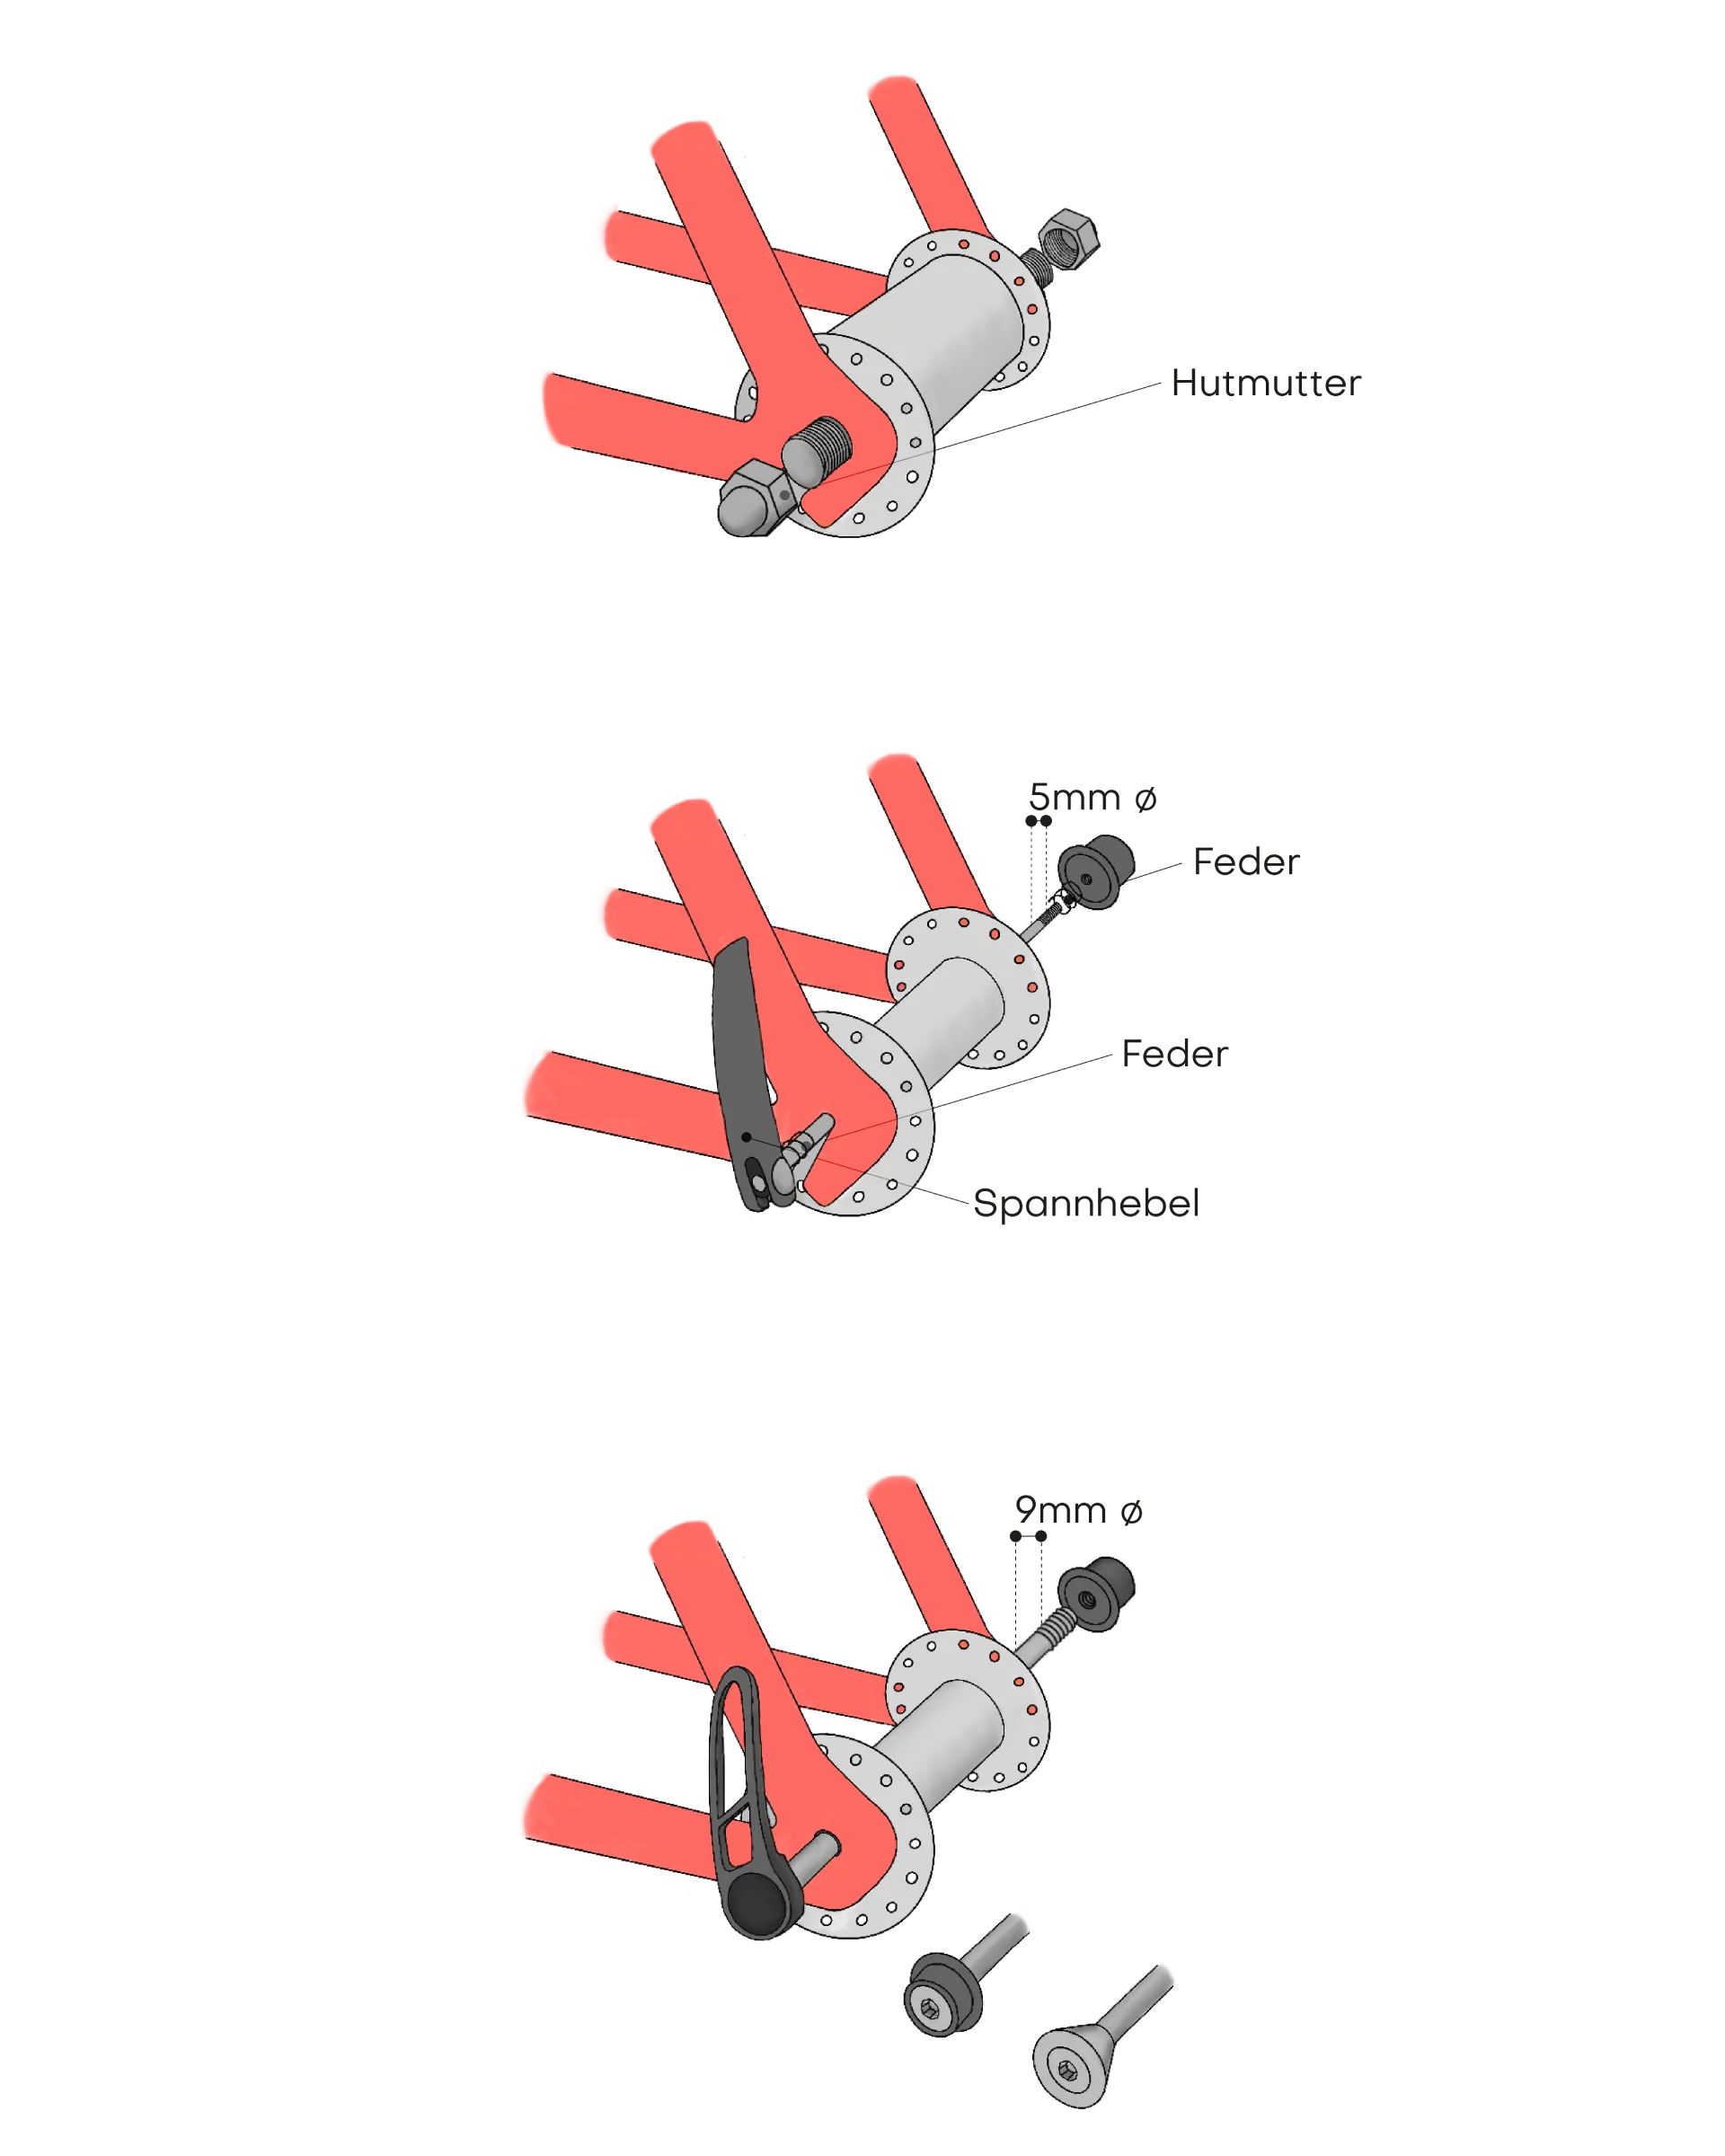
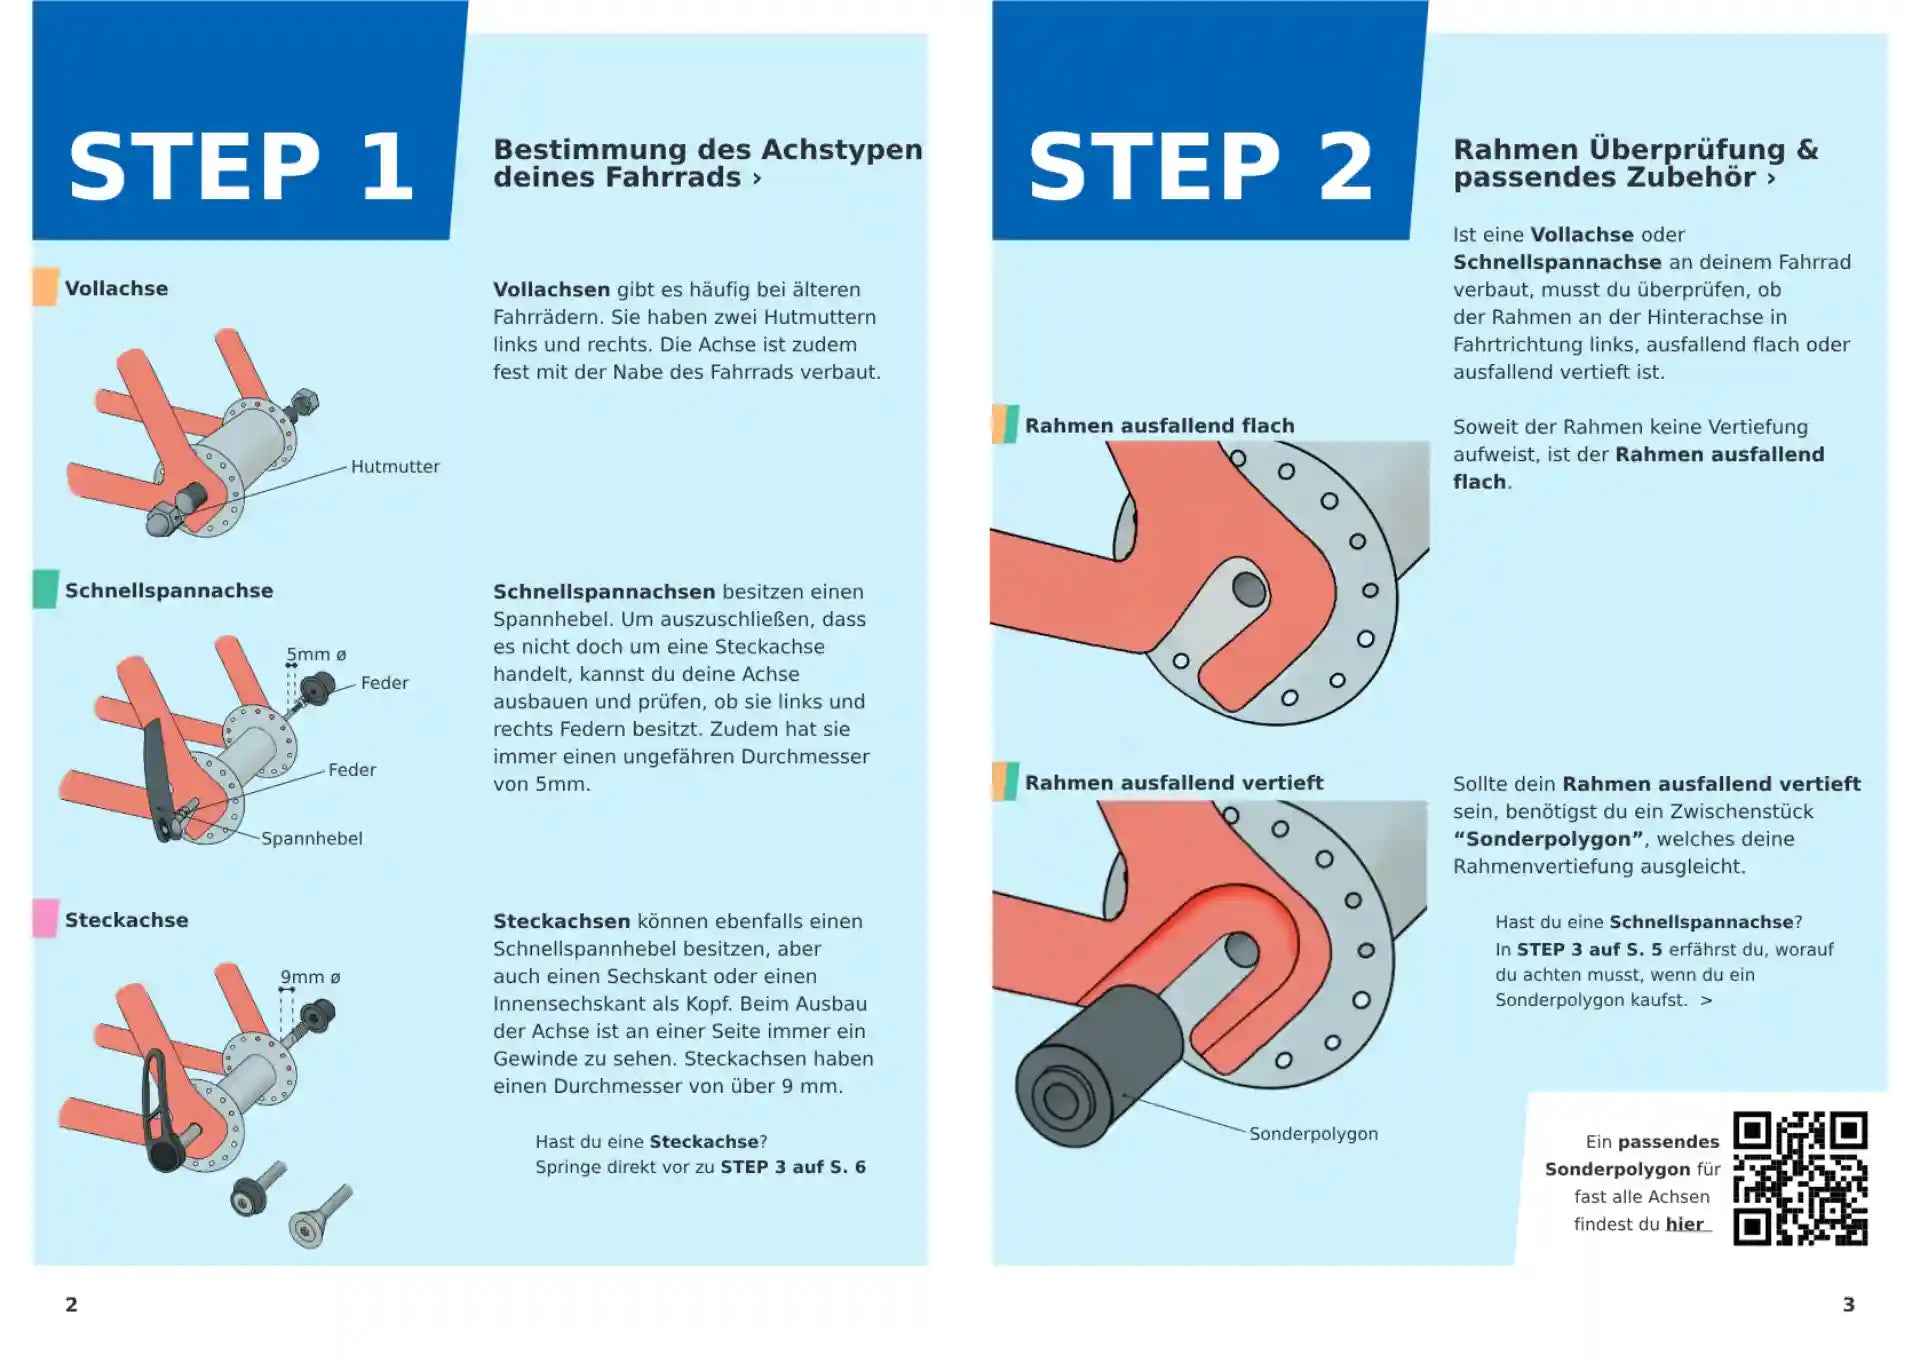
1. Determine axle type
- Solid axle (Fig. 1) : Are firmly connected to the hub via cap nuts on the left and right. Older bicycles often have solid axles.
- Quick release axle (Fig. 2) : Has a clamping lever with a diameter of about 5 mm and springs on the left and right.
- Thru axle (Fig. 3) : Can also have a quick release lever, but have a diameter of more than 9 mm and a visible thread on one side.
Do you have a thru axle? Then skip straight to step 3.
2. Frame inspection and accessories
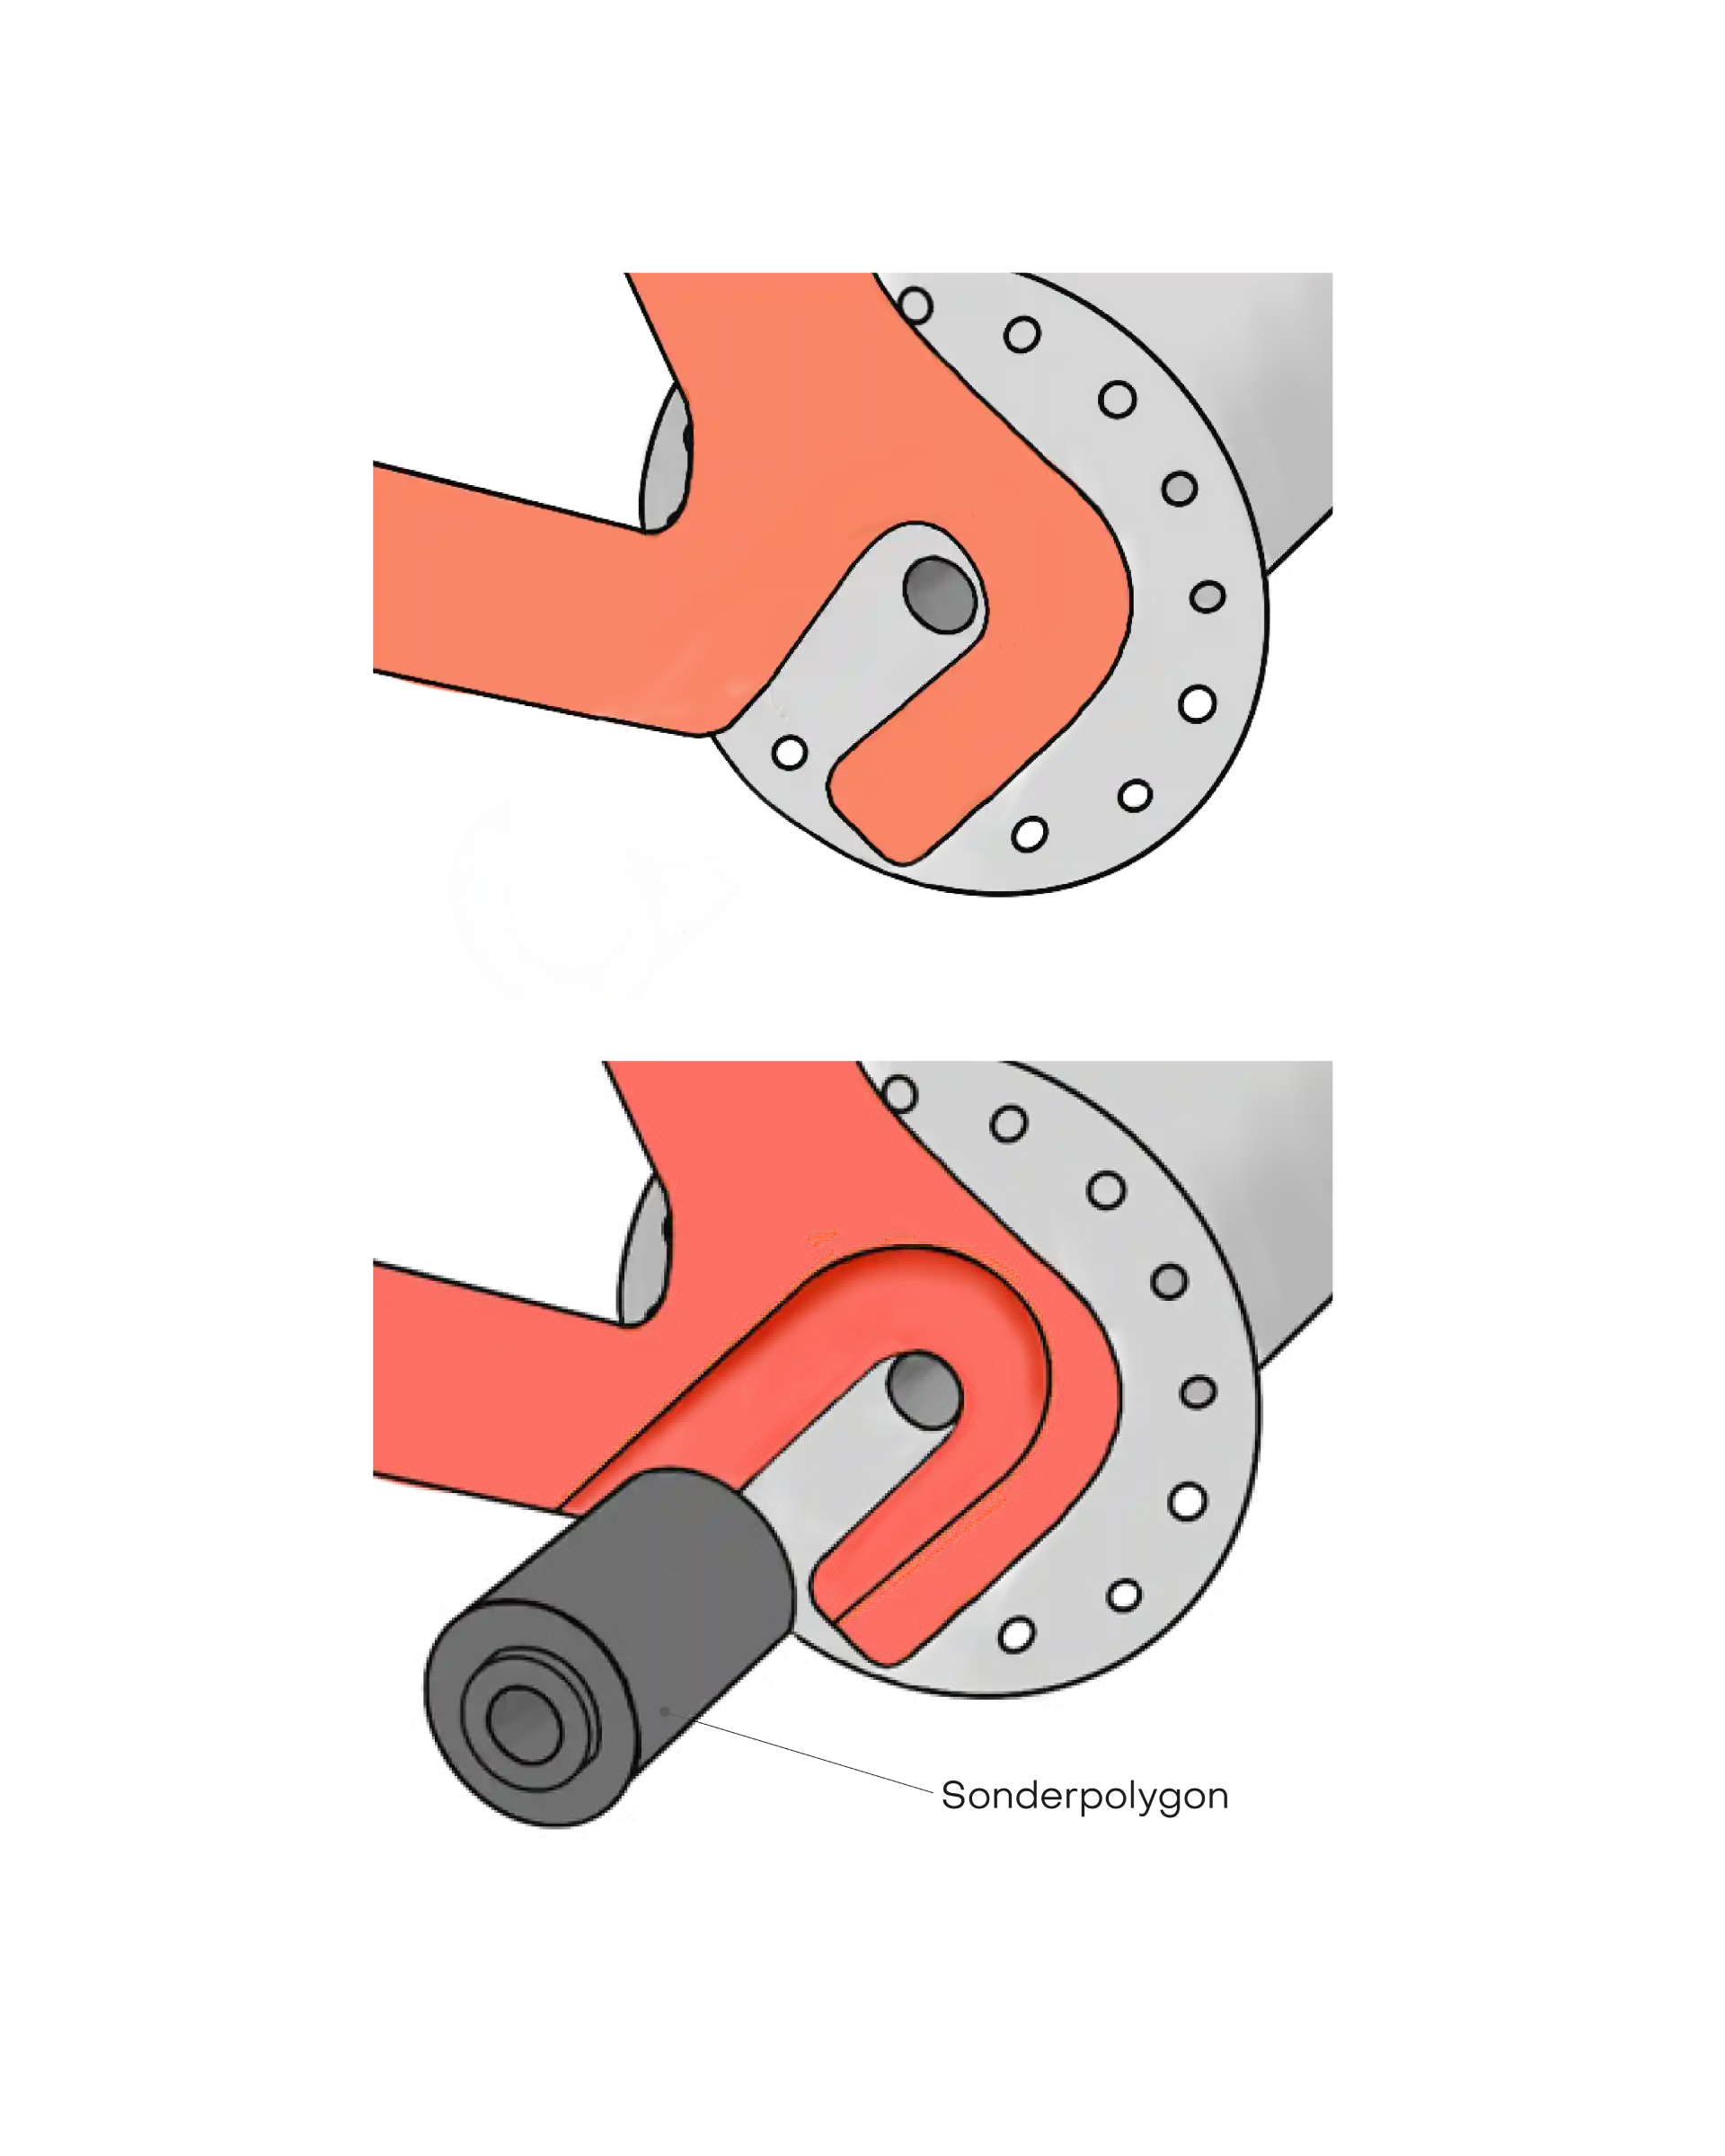
Now check your quick-release axle or solid axle to see if the frame is flat or recessed on the left side in the direction of travel:
- If the frame has no indentation, it is unusually flat (see image above).
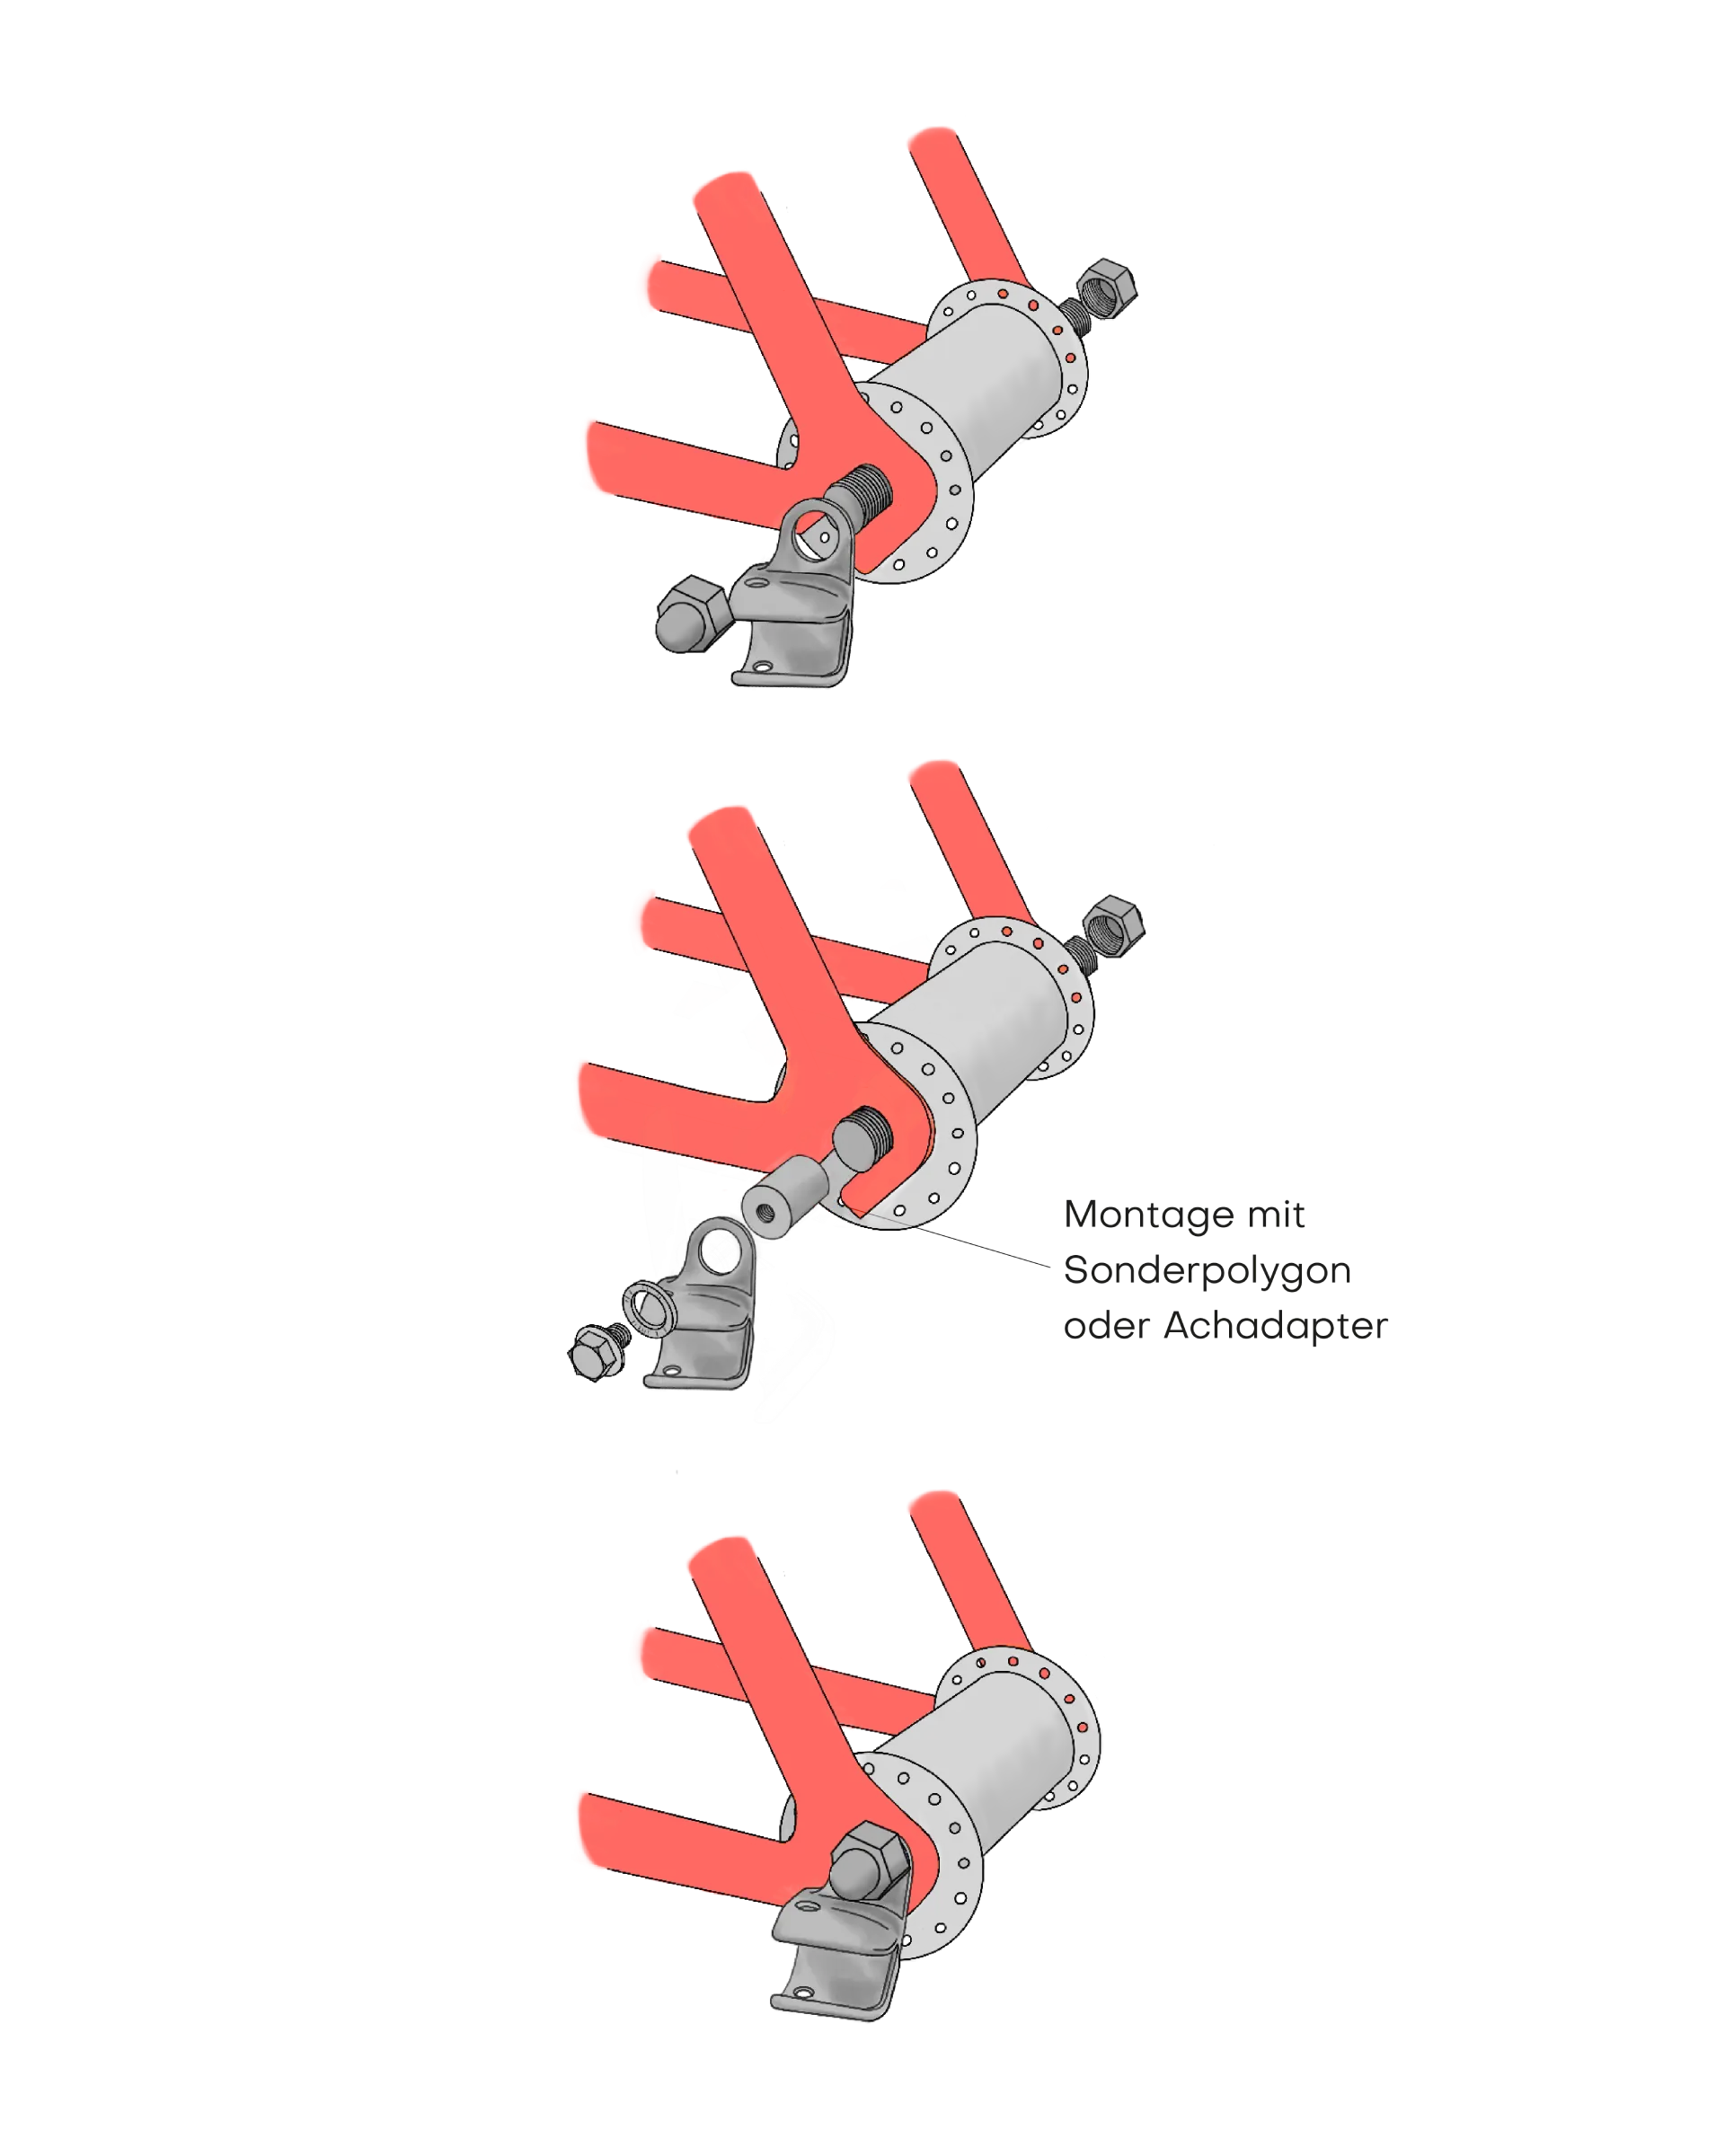
- For a recessed frame, you will need an extension adapter for quick-release axles (e.g., here ) and for solid axles, a solid axle adapter (e.g., here ) to compensate for the recess (see image below).
For all quick-release axles, you can learn more about the special polygon in step 3.2.
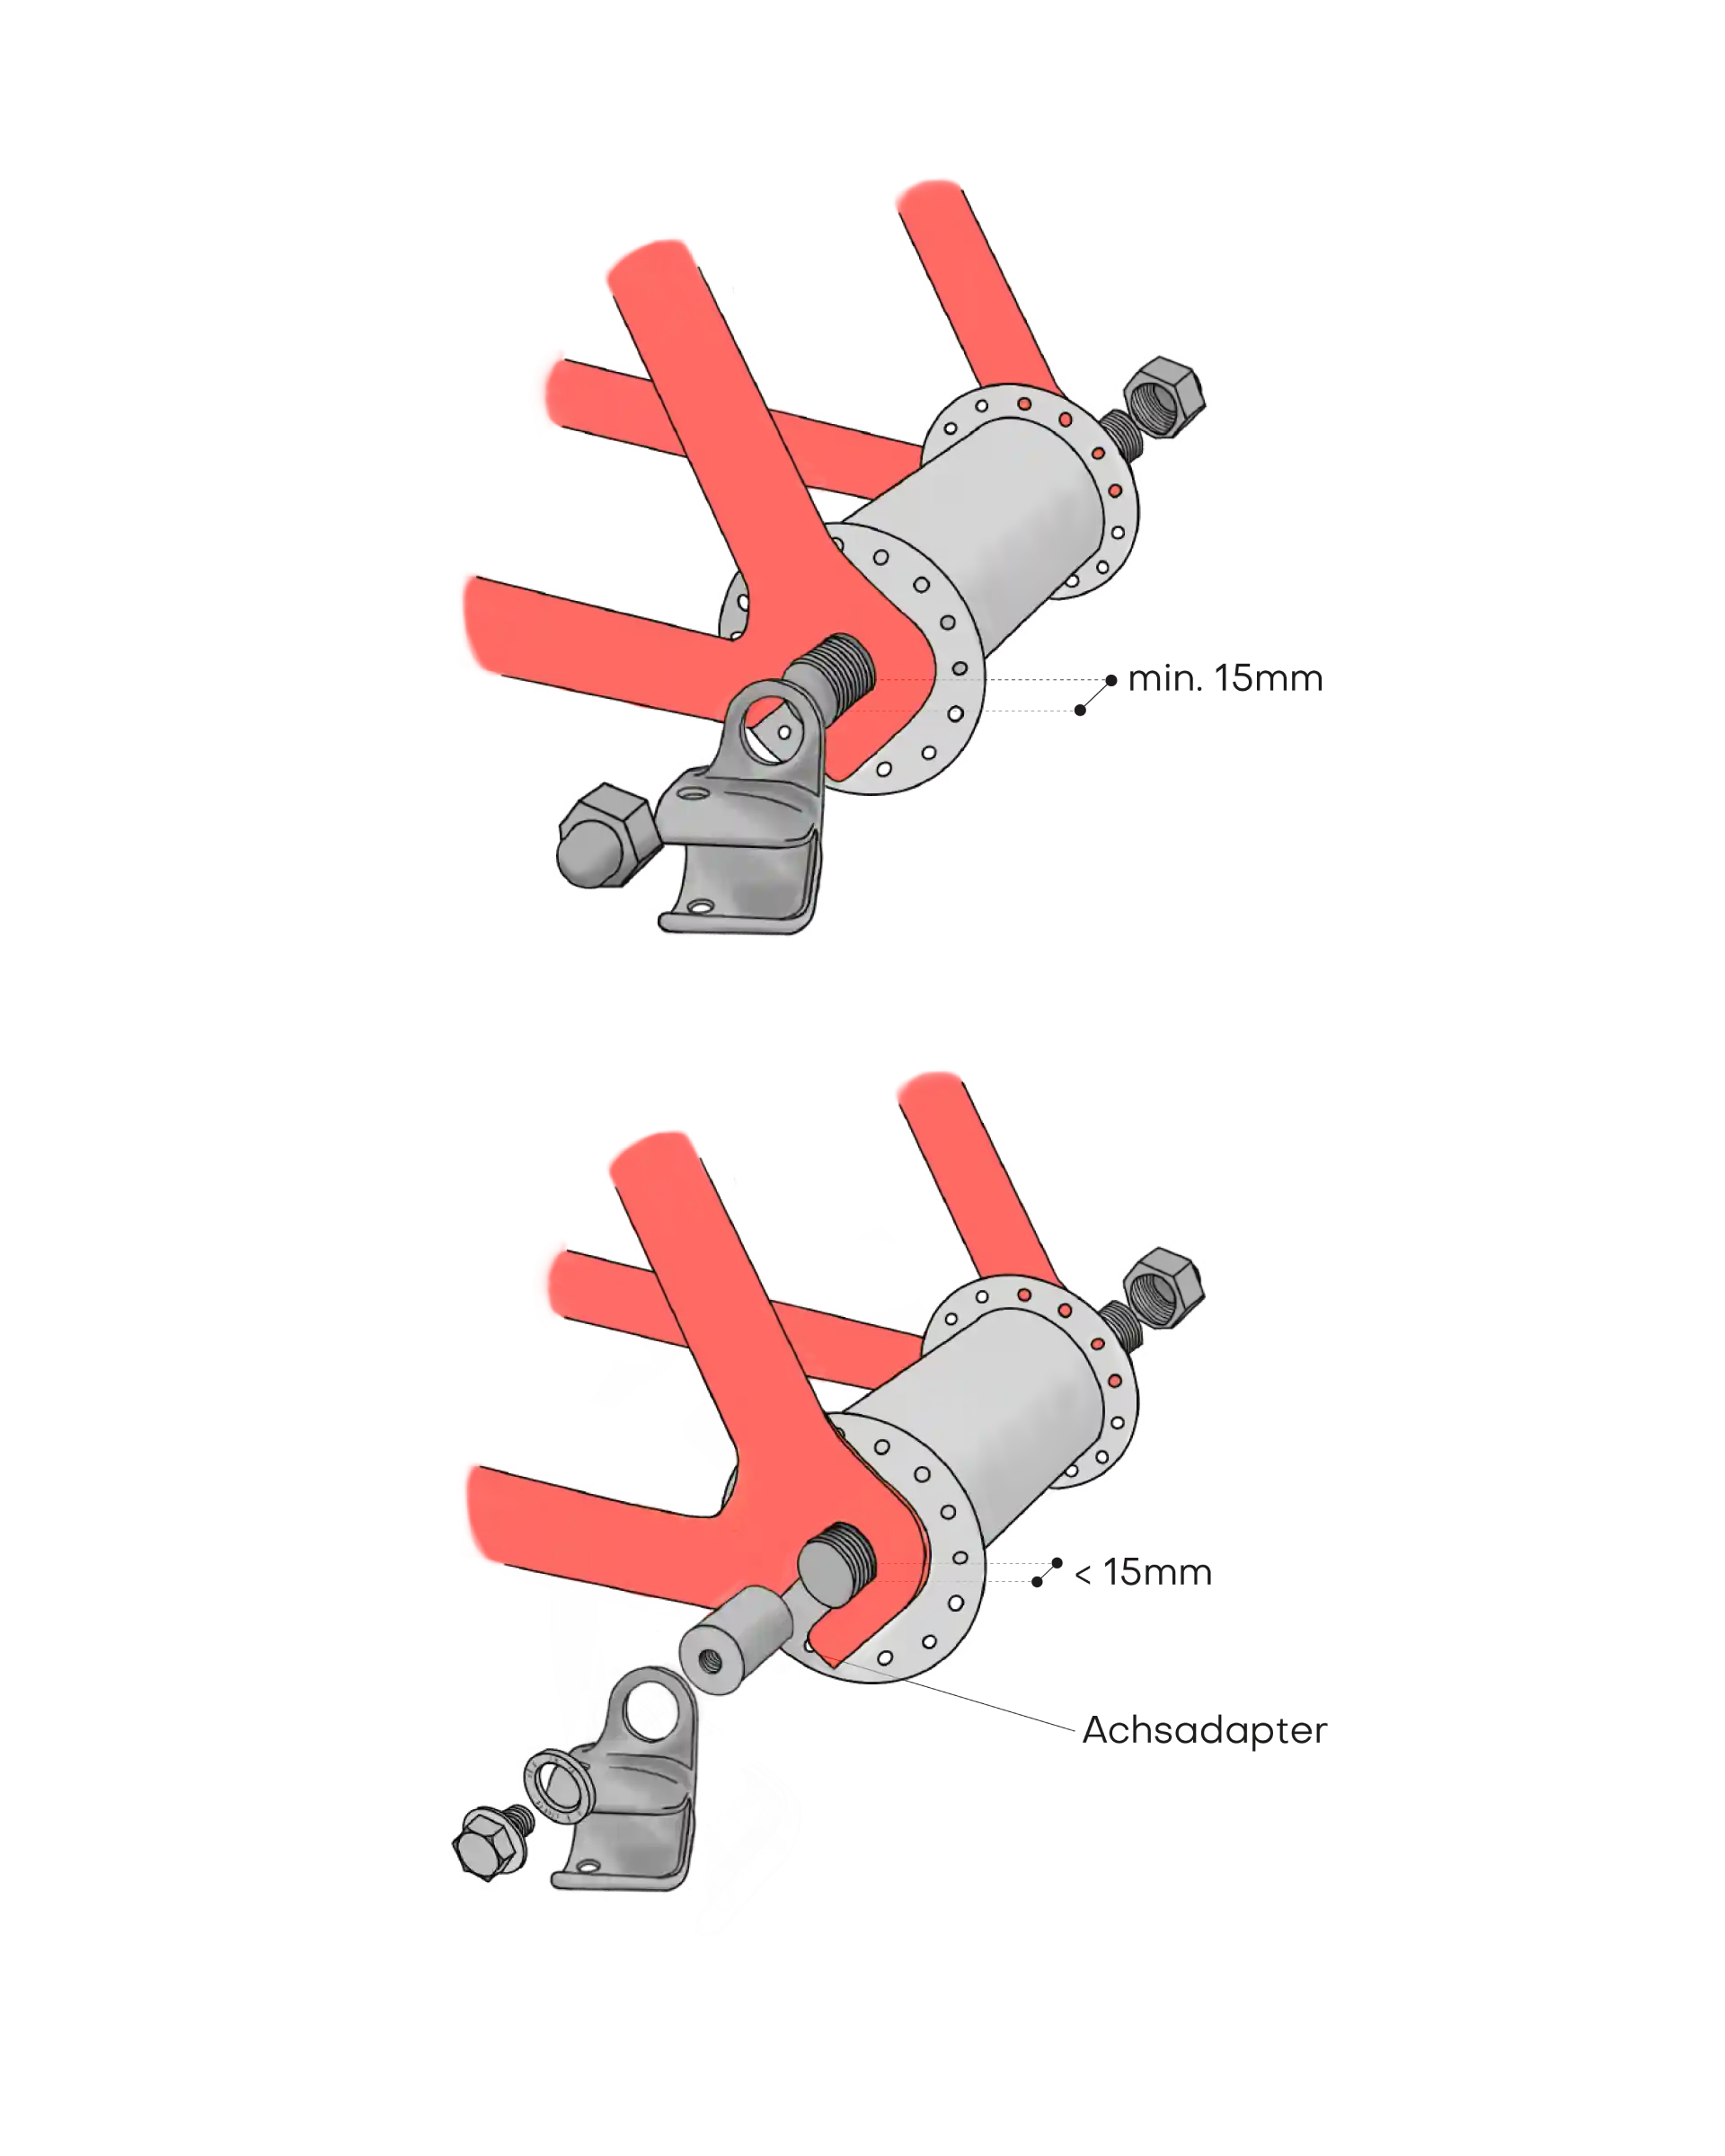
3.1 Checking the solid axle and accessories
If you have a solid axle , check now whether you can use it without problems, need accessories, or need to replace it.
- Loosen the cap nuts and measure to see if At least 15 mm of residual thread must be present on the solid axle.
- If so, you can easily attach the coupling.
- If not, you'll need a solid axle adapter.
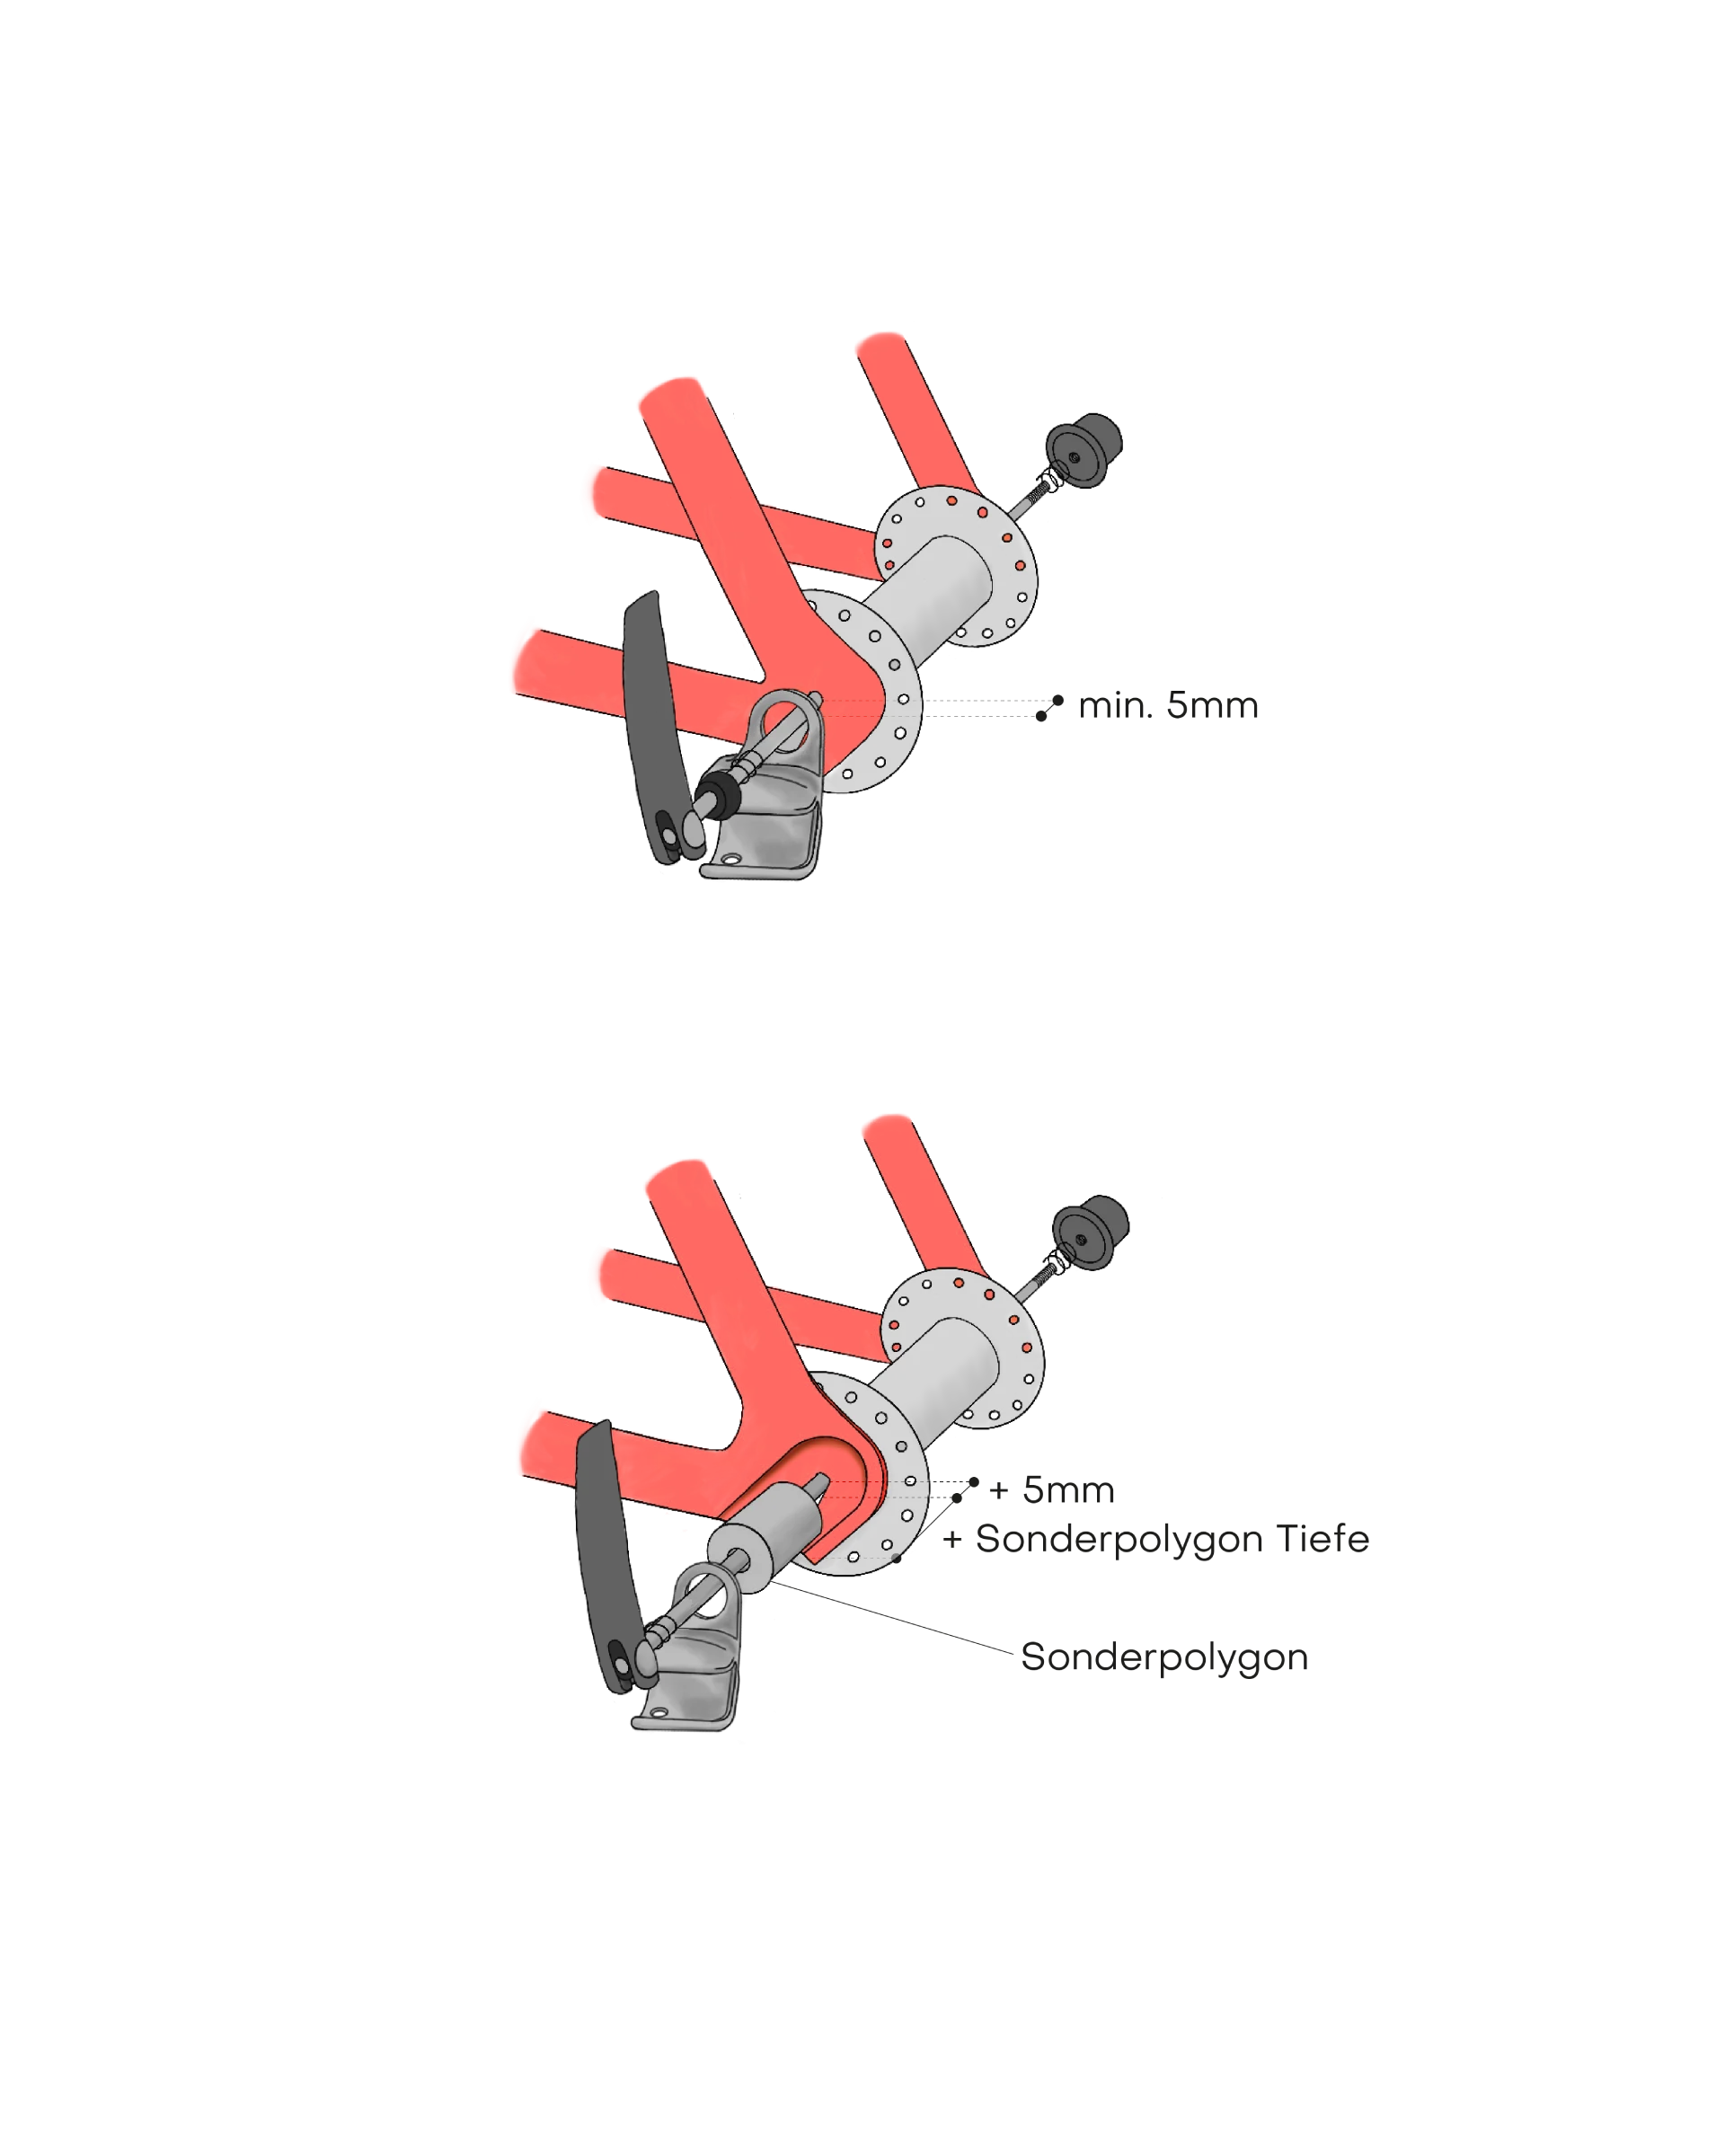
3.2 Checking the quick release axle and accessories
If you have a quick-release axle instead, check its compatibility as follows:
- Frame protrudes too low: Loosen the quick-release fastener and check if the axle protrudes at least 10mm (nut + coupling piece) on the other side for attaching the coupling ( Note: If less than 10mm remains on the other side of the axle, your axle is too short and you need an adapter ).
- Frame recessed: You need to compensate for the recess with an adapter so that the coupling can be attached.
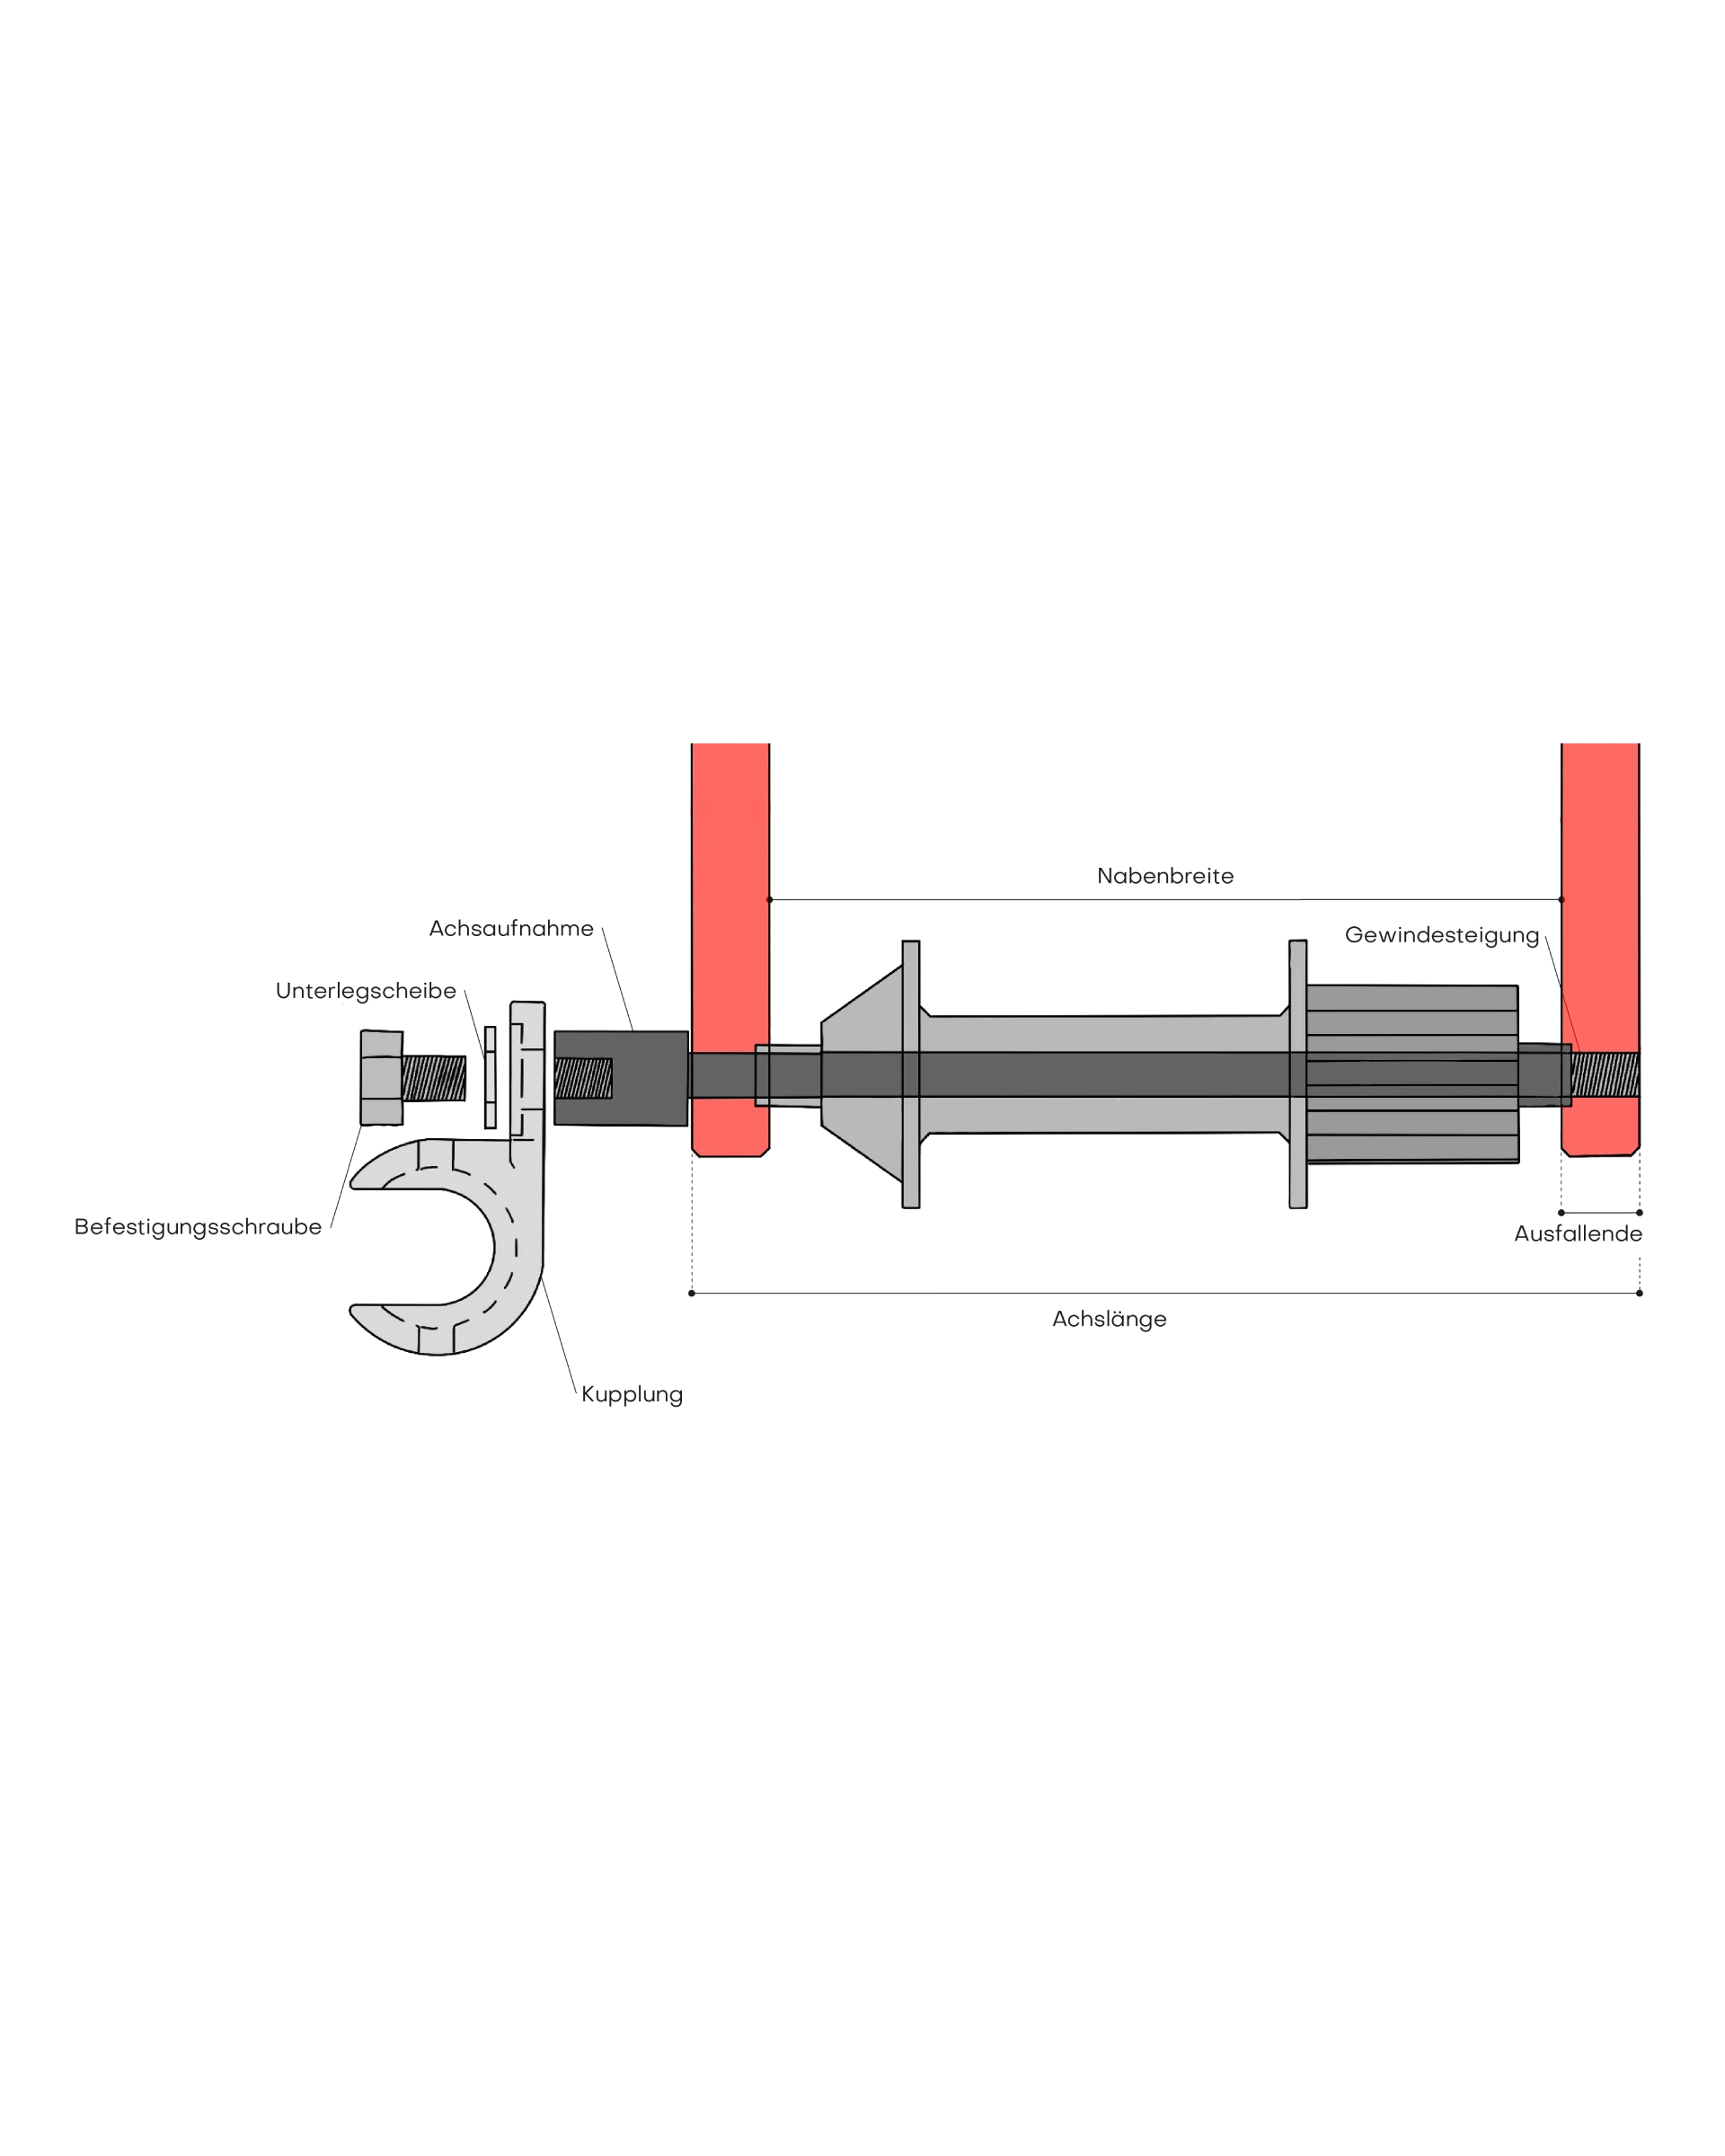
3.3 Checking the thru axle and accessories
If you have a thru-axle instead, proceed as follows:
- For a thru-axle, you need an axle with a coupling mount .
- Compare the illustration in the assembly instructions with your axle to determine the axle length, axle mount and thread pitch, and to find the appropriate axle.
4.1 Solid axle - assembly and instructions
Solid axle: The coupling must be correctly aligned and securely fastened. Refer to the enclosed instructions for the coupling and accessories.
4.2 Quick release axle - assembly and instructions
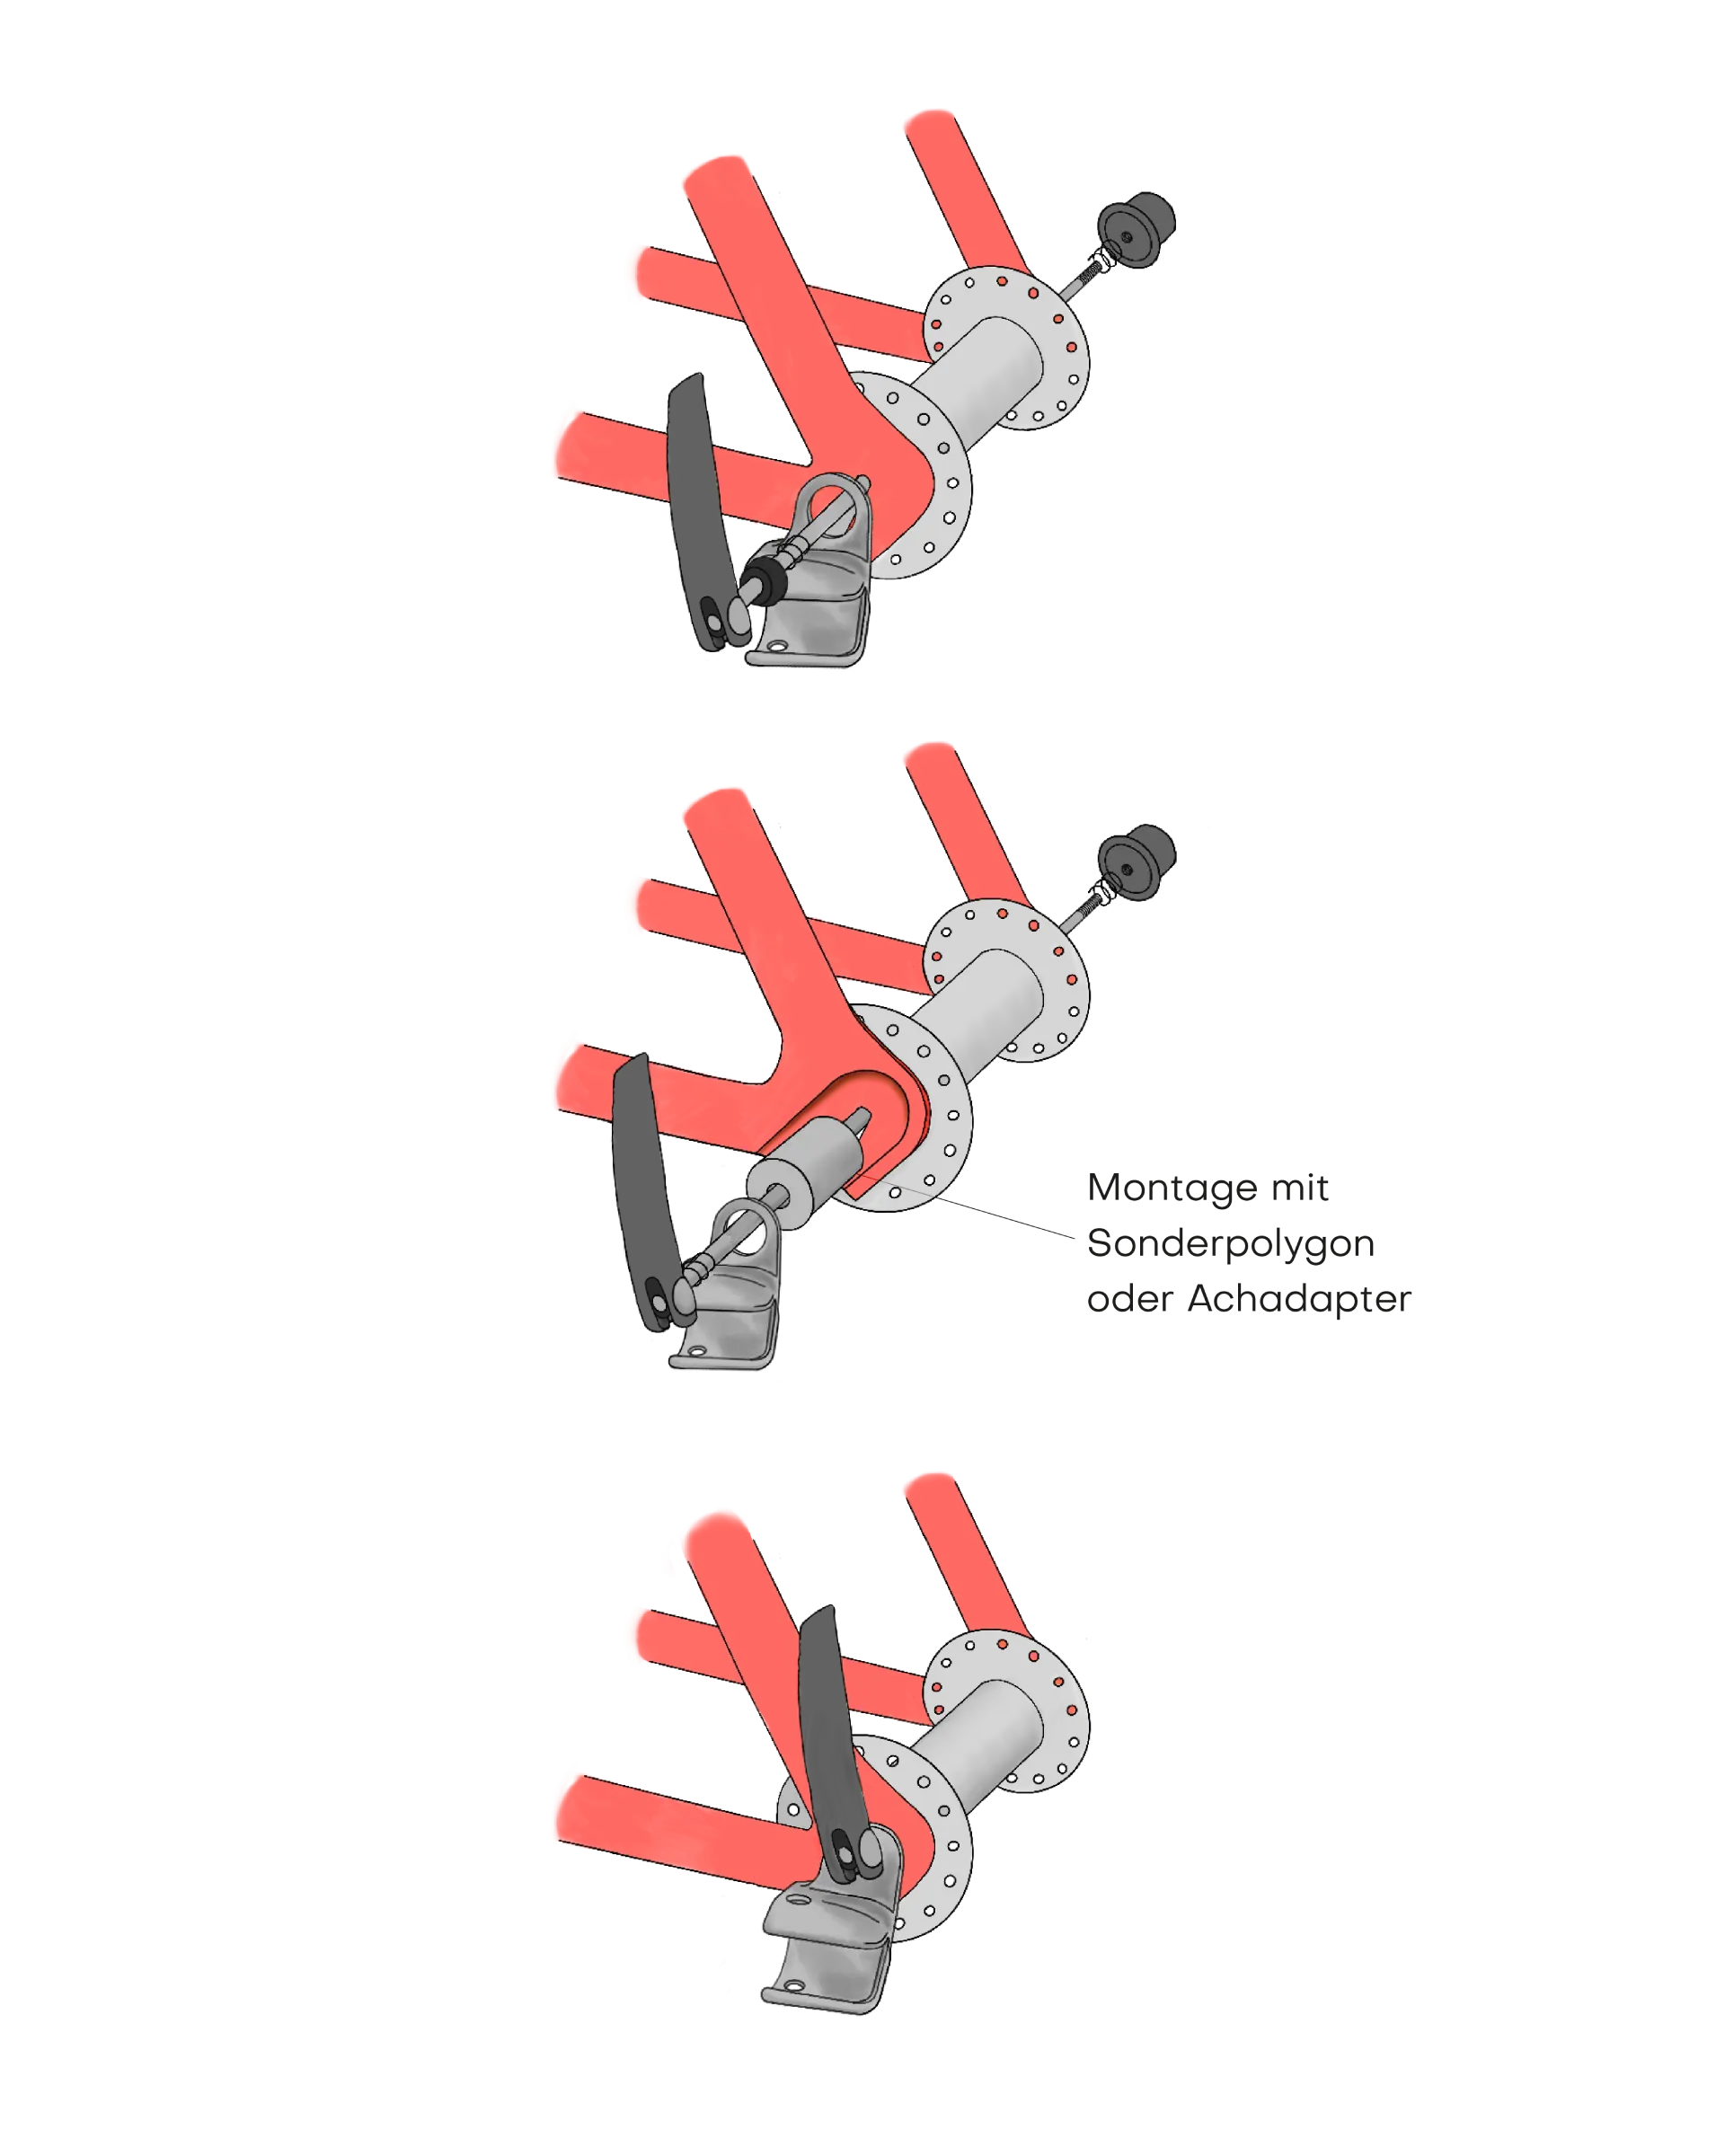
Quick-release axle: Slide the coupling and, if applicable, the adapter onto the axle and reinstall it. Refer to the enclosed instructions for the coupling and accessories.
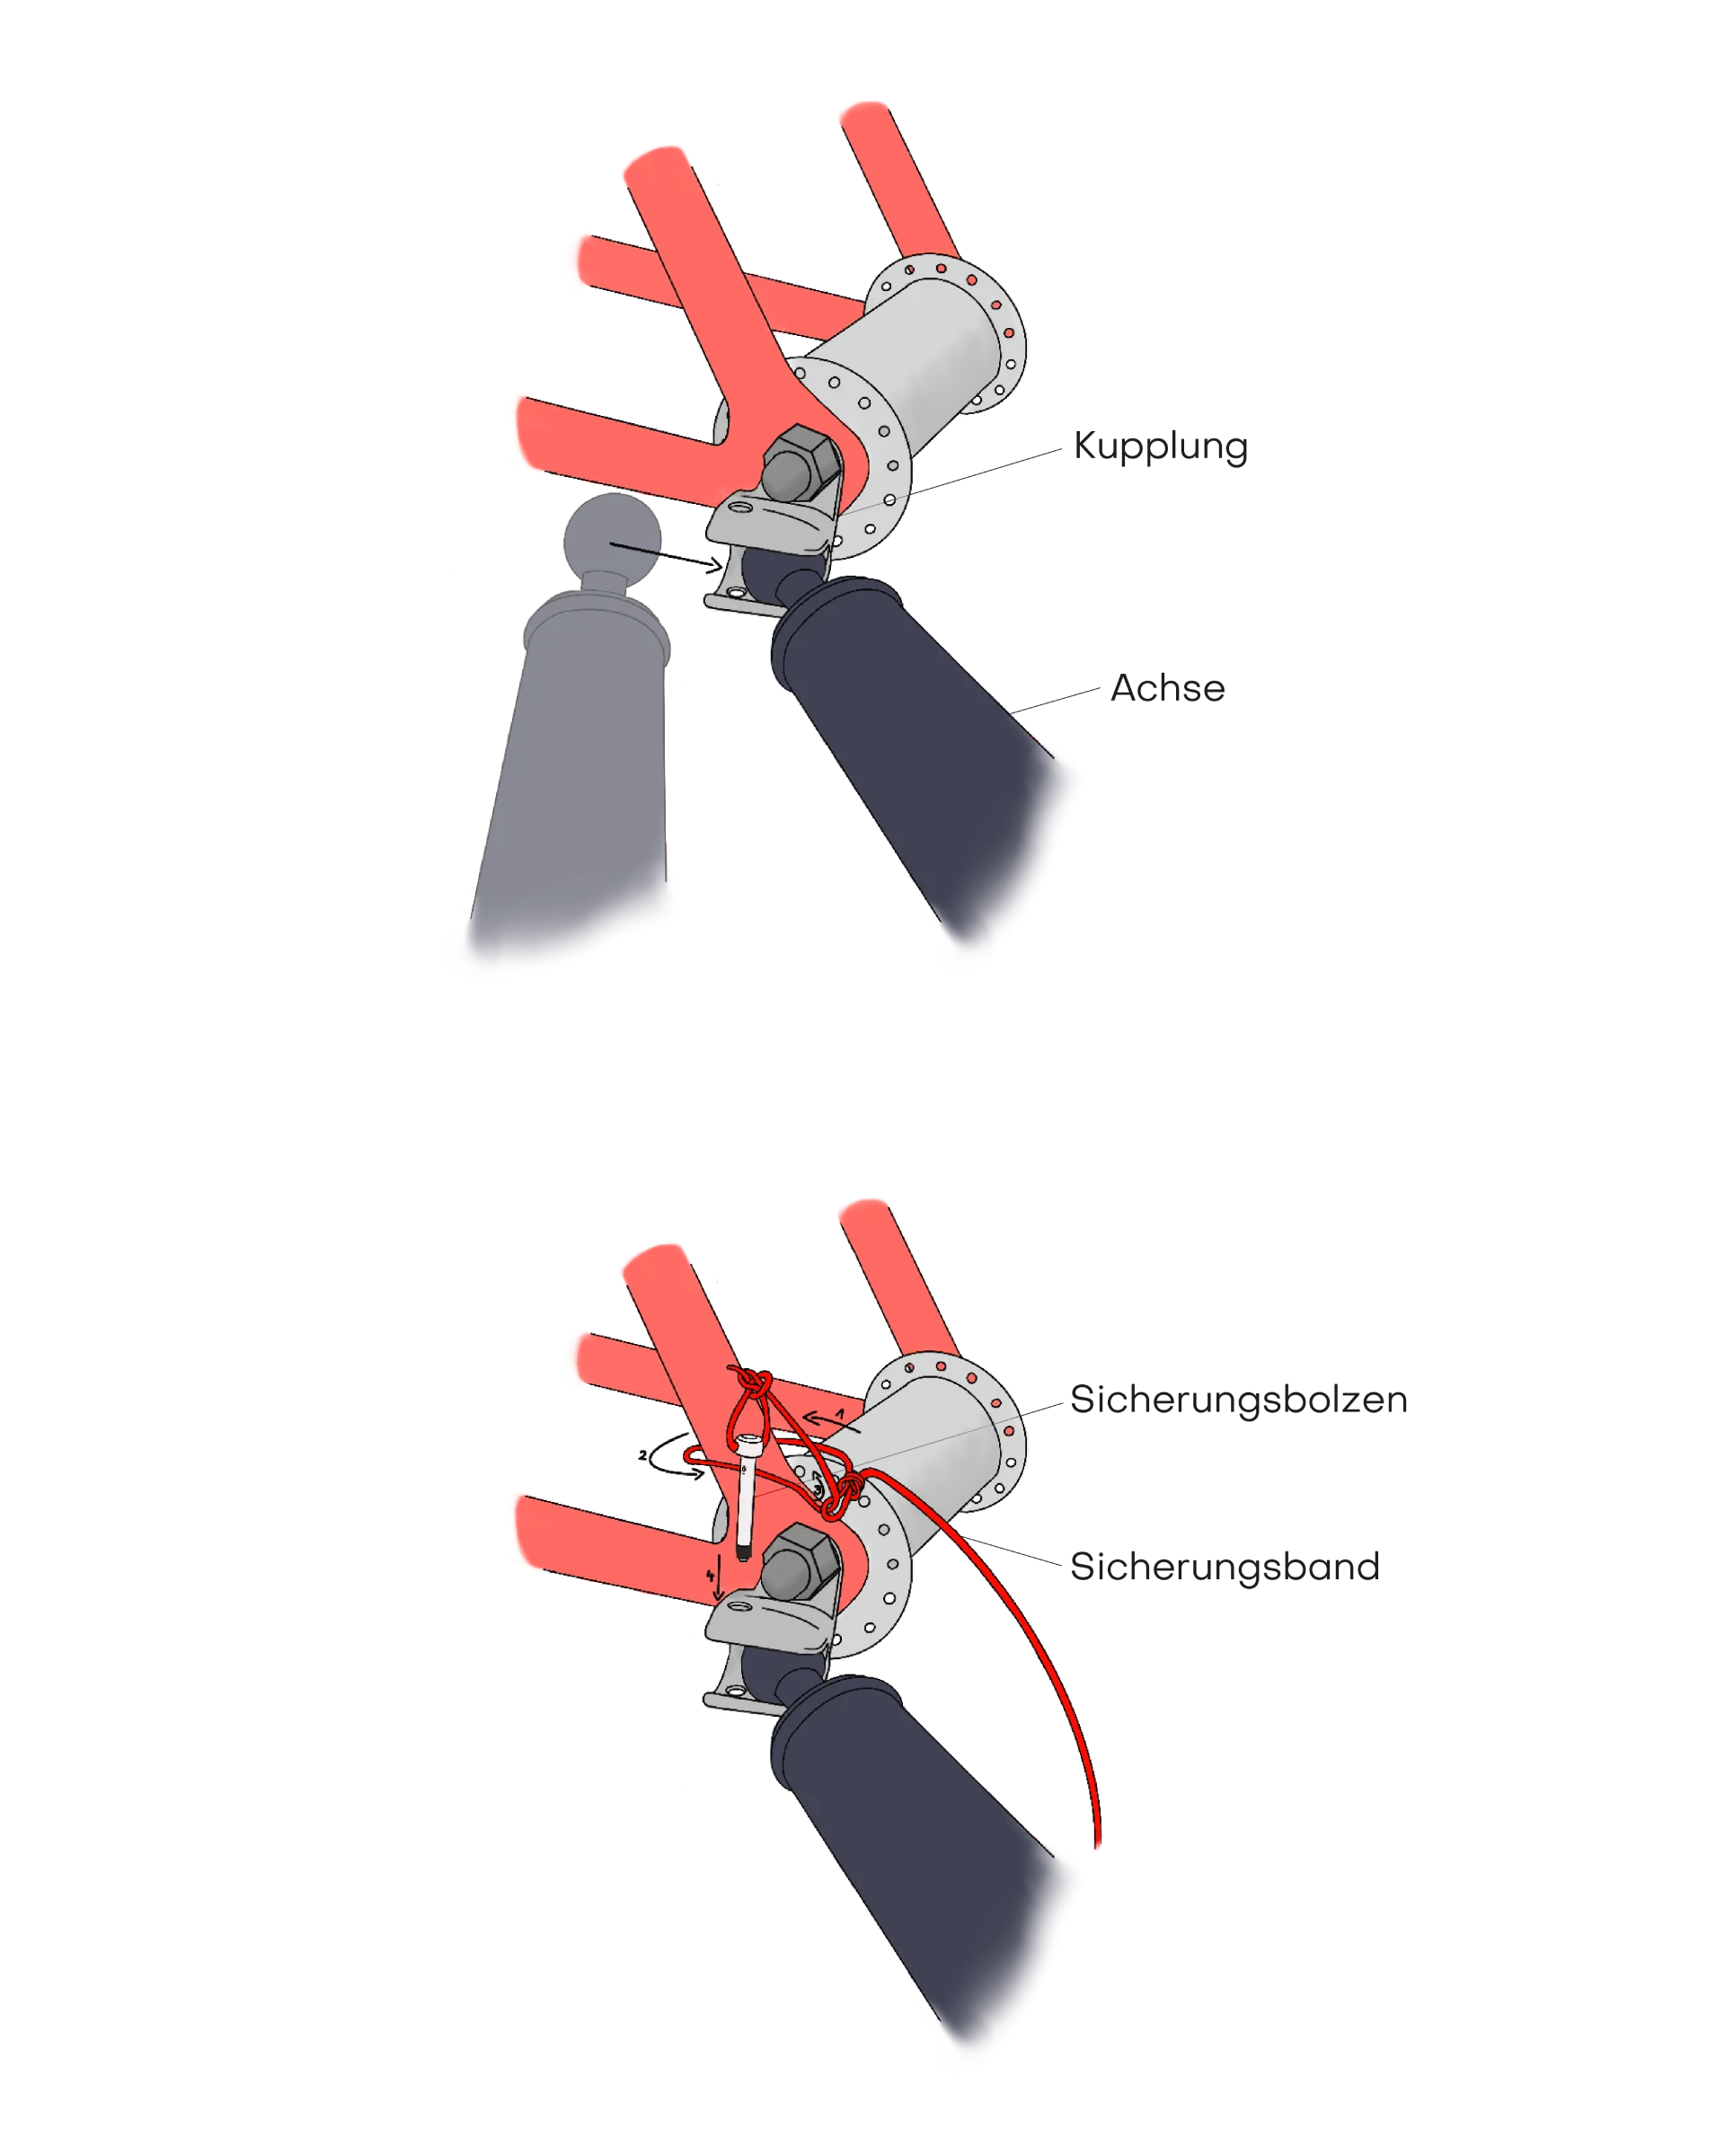
5. Attach and secure the drawbar
Insert the ball head of the bicycle trailer hitch into the coupling on the bicycle and secure it around the frame with the safety cable. Thread the safety cable once around the frame and back through the loop in the cable. Now insert the locking pin into the coupling until it audibly clicks into place.
Now you can safely use your VEOLO trailer with your bicycle.
1. Determine axle type
- Solid axle (Fig. 1) : Are firmly connected to the hub via cap nuts on the left and right. Older bicycles often have solid axles.
- Quick release axle (Fig. 2) : Has a clamping lever with a diameter of about 5 mm and springs on the left and right.
- Thru axle (Fig. 3) : Can also have a quick release lever, but have a diameter of more than 9 mm and a visible thread on one side.
Do you have a thru axle? Then skip straight to step 3.
2. Frame inspection and accessories
Now check your quick-release axle or solid axle to see if the frame is flat or recessed on the left side in the direction of travel:
- If the frame has no indentation, it is unusually flat (see image above).
- For a recessed frame, you will need an extension adapter for quick-release axles (e.g., here ) and for solid axles, a solid axle adapter (e.g., here ) to compensate for the recess (see image below).
For all quick-release axles, you can learn more about the special polygon in step 3.2.
3.1 Checking the solid axle and accessories
If you have a solid axle , check now whether you can use it without problems, need accessories, or need to replace it.
- Loosen the cap nuts and measure to see if At least 15 mm of residual thread must be present on the solid axle.
- If so, you can easily attach the coupling.
- If not, you'll need a solid axle adapter.
3.2 Checking the quick release axle and accessories
If you have a quick-release axle instead, check its compatibility as follows:
- Frame protrudes too low: Loosen the quick-release fastener and check if the axle protrudes at least 10mm (nut + coupling piece) on the other side for attaching the coupling ( Note: If less than 10mm remains on the other side of the axle, your axle is too short and you need an adapter ).
- Frame recessed: You need to compensate for the recess with an adapter so that the coupling can be attached.
3.3 Checking the thru axle and accessories
If you have a thru-axle instead, proceed as follows:
- For a thru-axle, you need an axle with a coupling mount .
- Compare the illustration in the assembly instructions with your axle to determine the axle length, axle mount and thread pitch, and to find the appropriate axle.
4.1 Solid axle - assembly and instructions
Solid axle: The coupling must be correctly aligned and securely fastened. Refer to the enclosed instructions for the coupling and accessories.
4.2 Quick release axle - assembly and instructions
Quick-release axle: Slide the coupling and, if applicable, the adapter onto the axle and reinstall it. Refer to the enclosed instructions for the coupling and accessories.
5. Attach and secure the drawbar
Insert the ball head of the bicycle trailer hitch into the coupling on the bicycle and secure it around the frame with the safety cable. Thread the safety cable once around the frame and back through the loop in the cable. Now insert the locking pin into the coupling until it audibly clicks into place.
Now you can safely use your VEOLO trailer with your bicycle.

The complete assembly instructions as a PDF download
Download the step-by-step instructions for mounting the trailer hitch on your bike.
Standard clutch vs. Weber clutch
The standard coupling is a tried and tested system similar to the Thule bicycle coupling, which consists of a ball head on the drawbar and the matching counterpart on the bicycle . A cotter pin and a safety rope ensure that the trailer is securely attached with almost no play. This system is durable, hardly noticeable and is installed by us as standard. We supply the counterpart for the bicycle.
In comparison, the Weber coupling is technically a little more complex. It has an elegant drawbar connection and even a lock to secure the trailer to the bike. However, a slightly larger coupling piece remains on the bike and you have to buy the part required to mount it on the bike separately .
Suitable accessories for your bicycle trailer coupling
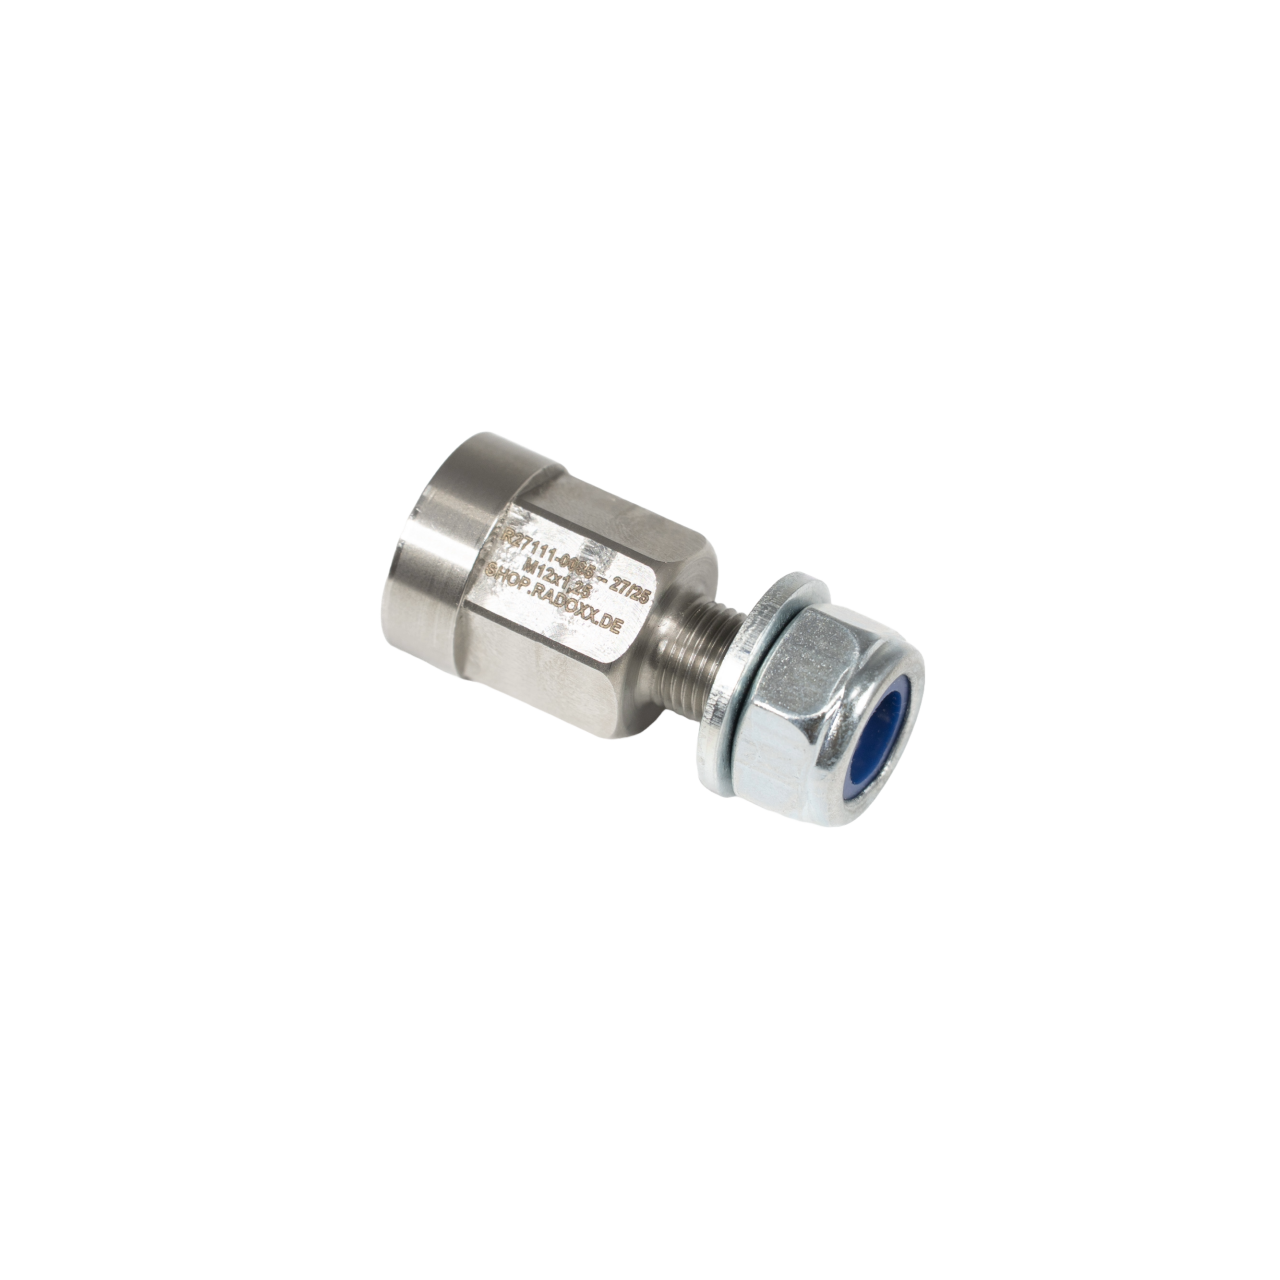
axle adapter
If your solid axle has less than 15 mm remaining thread.
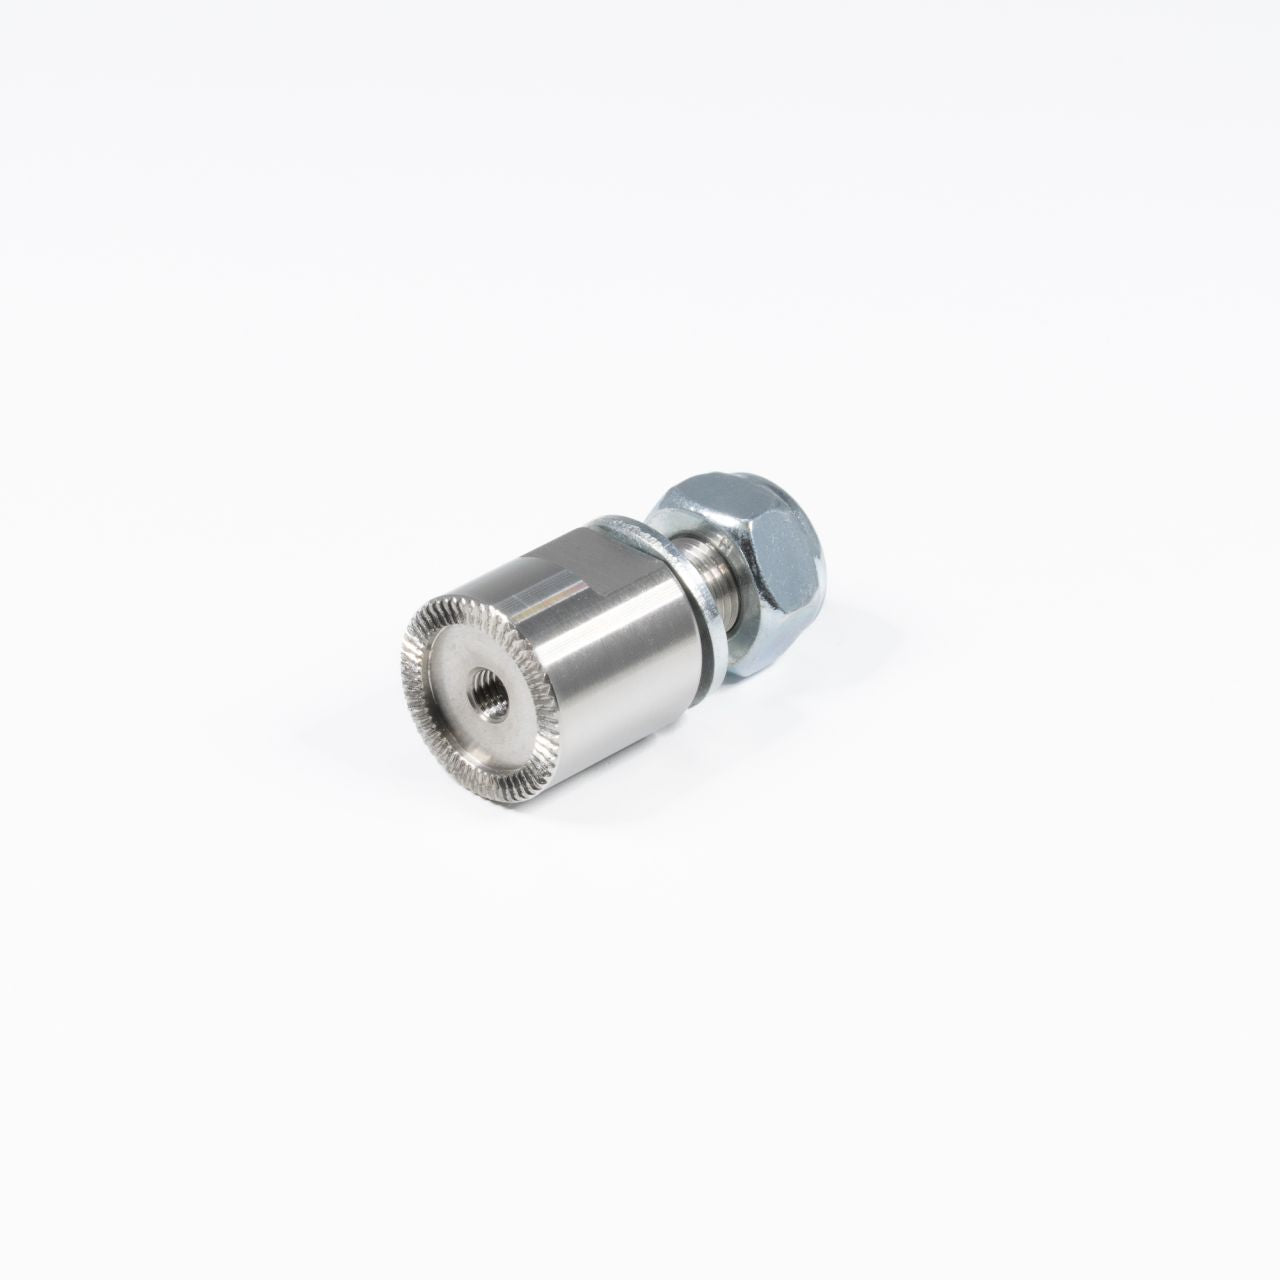
special polygon
If the frame of your quick release axle is recessed.

thru axle
If your thru axle does not have a clutch mount.
FAQs about the VEOLO bicycle trailer coupling
Does the VEOLO coupling fit the thru axle of gravel bikes?
To mount it on your gravel bike, you need a suitable, new thru axle. This has a mount on the side for attaching various coupling systems. We always send the appropriate coupling piece from Thule.
Is the appropriate bicycle-side coupling included in the delivery?
Yes, we send the matching Thule coupling piece as standard. Alternatively, you can also order the Weber coupling when configuring the VEOLO Cargo for a small additional charge.
What is the difference between the standard clutch and the Weber clutch?
Standard coupling (analog Thule):
- Simple and proven system, with a ball head on the drawbar and the counterpart on the bike (identical to the Thule coupling). The trailer is secured to the bike with a cotter pin and a safety rope. Almost free of play, durable and unobtrusive.
- We install it as standard and supply it with a counterpart for the bike.
Weber clutch:
- Technically complex and proven coupling system. Still very popular.
- Nice drawbar connection with integrated lock for locking the trailer with the bike. A slightly larger coupling piece remains on the bike.
- Attention: Due to the specific requirements, we do not include the coupling piece for mounting on the bike!
- Cannot be combined with the drawbar
You can find further information on installing the bicycle trailer coupling and any necessary accessories in our instructions.